Formatting a Text and Numbers
Category : 9th Class
 Formatting a Text and Numbers
Various formatting styles on Text and Numbers as per requirement are permitted by Excel. The document become more feasible, pleasing appearance also shows more values by using these formatting styles. You need to click a particular cell and start typing to enter data in the cell of worksheet. By pressing Tab and Arrow Keys of the keyboard you can enter the data.
 Selecting Cell or Cell Range
- If you want to perform any operation on data then you need to select cell or range of cells. You need to follow the following steps to select the cell or cells in a worksheet: (See Figure. 9.7.3)
- Firstly click the cell which you want to select and same in case of range of cells, you need to press and the document through mouse in the starting cell.
- Then move the mouse to destination or end cell and release it.
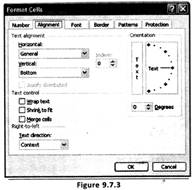
Text Alignment
It allows you to align the Text of the document.
 Implementation of Text is done in the following ways:
- Firstly select the cells on which you need a text to be aligned.
- Then select Format
 Cells Alignment tab to open Format Cells dialog box, as shown in the following figure:
- Further you need to select the desired option to align text vertically or horizontally in the Text alignment area.
- Then click OK to accept the settings.
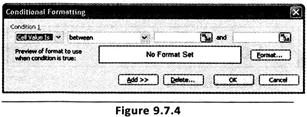
Implementation of Conditional
Formatting Editing the style of Text, numbers and the pages based on conditions are performed under formatting option. If the contents in the Cells satisfied those conditions then the formatting will take effect. Therefore, there is no need to make any changes and check the conditions manually. Implementation of Conditional formatting is done in the follow-
- To display the Conditional Formatting dialog box, select Format -> Conditional
- Formatting, as shown in the following figure:
- Then select the type of condition from the dropdown list according to the requirement.
- After that select the range of the cells which are in need.
- Then to add more conditions click Add.
- Finally to accept the changes click OK.
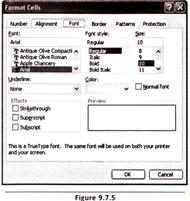
Formatting Text
- As per the requirement you can format a Text, such as changing the font of Text from Arial to Times New Roman or by changing its size from 11 to 14. Formatting of Text can be done in a worksheet in the following ways: (See Figure. 9.7.5)
- Firstly select the text, which needs to format.
- Then to display the Font tabbed page, select Format -> Cells -> Font to open Format Cells dialog box, as shown in the following figure:
- Finally to apply the settings click OK.
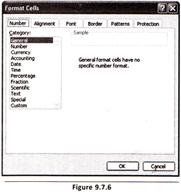
Formatting The Numbers
- To change the property of a value in a cell to fraction, time, text and many more is permitted by Formatting numbers. Number Formatting is done by performing the following steps:
- The cells which you need to format, select it first.
- To display the Numbers tabbed page, select Format -> Cells -> Number to open Format Cells dialog box, as shown in the following figure: (See Figure. 9.7.6)
- According to the requirement to format the number select the Number attributes.
- Then to apply the settings and click OK.
Coloring the Cells
- You may fill the colour and a specific pattern in a cell. Colours in the Cell can be filled as:
- To display the Pattern Tabbed page, select Format -> Cells -> Patterns tab to open Format Cells dialog box, as shown in the following figure:
- From the Colour Pallet select the Colour and a specific pattern. To accept the changes click OK.


