Introduction to MS-Access 2013
Category : 9th Class
Introduction to MS-Access 2013
Introduction
Our lives revolve around to obtain, upgrade and maintain data and to a great extend depends upon it. From the normal daily life to working in an organization to the growth of any nation, everything depends upon on information.
However, data in its raw and unprocessed form is meaningless, but when such data is converted into information it is useful. Hence it is essential to provide a structure to the available data and organise it, which can be achieved with of a database. Database is an organised collection of information that can be easily be accessed, managed and updated.
Need of Database
Earlier, it was difficult to maintain a database which consists of hundreds and thousands of records. However, when a piece of information was to be updated, it had to be done separately in all related files. These problems created the need for designing a database which could handle vast amount of data. A database management system (DBMS) is a powerful tool used to store data, secure it, protect it and make it quickly available to people who need it. We need DBMS for the following reasons:
In this chapter, we will be covering the basic process of starting Access and creating a database.
To Create a Blank database
v Step 1: Select Blank desktop database enter the name and click the create button.
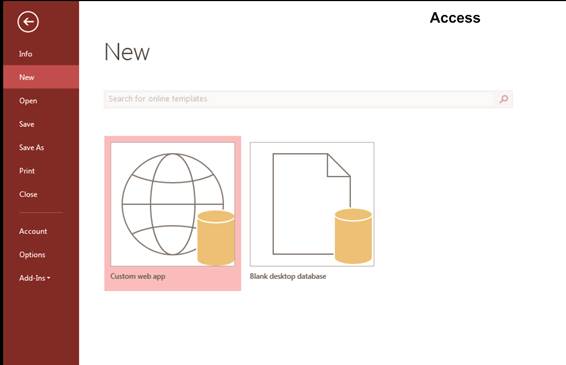
v Step 2: Access will create a new blank database and will open up the table which is also completely blank.
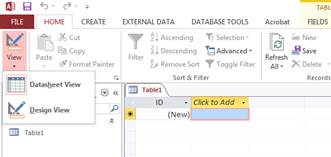
There are multiple ways to view a database object. The two views for tables are Design view and Datasheet view.
Creating a Table
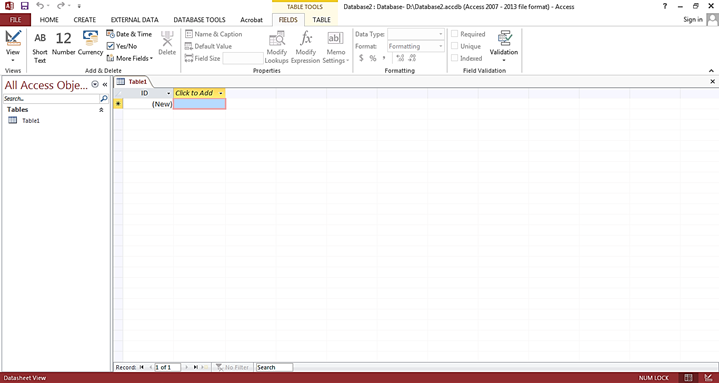
A table is a collection of data about a specific topic, such as employee information, products or customers. The first step in creating a table is entering the fields and data types. This can be done in either Datasheet View or Design View but it is recommended to set up the table in Design View.
To Create a Table in Design View:
1. Click on the Create tab.
2. Click on Table.
3. Switch over to Design View on the Home tab.
4. If prompted to save the table, enter a name and click on OK.
5. Type the field names and select the appropriate data type for each field.
6. Continue until all fields are added.
Note: The order that you enter the field names is the order the fields will appear in the table.
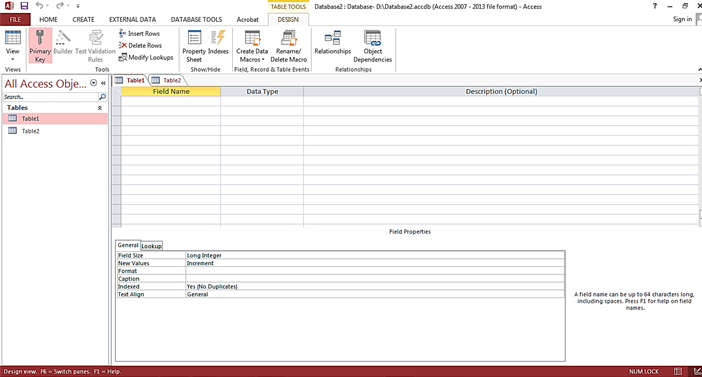
Setting a Primary Key
The Primary Key is the unique identifier for each record in a table. Access will not allow duplicate entries in a primary key field. When creating a new table, Access automatically creates a field "ID" with the autonumber data type and assigns this as the Primary Key.
To Set a Primary Key:
1. In Design View, position your cursor in the field you wish to set as the Primary Key. .
2. Click the Primary Key button on the toolbar.
3. Save the table.
Note: To turn off the Primary Key simply click on the Primary Key button again.

To Save the Table:
1. Click the Save icon on the toolbar.
2. Enter a name for the table if you haven't done so already.
3. Click OK.
Managing a Table
Whenever you make any changes (additions, deletions or edits) to a table, it is the original data file that you are altering. Unlike most other applications, a database does not make a working copy of the file first. For this reason, it is essential to keep a back-up copy of your file (to which you can. always return), just in case you make mistakes when carrying out amendments.
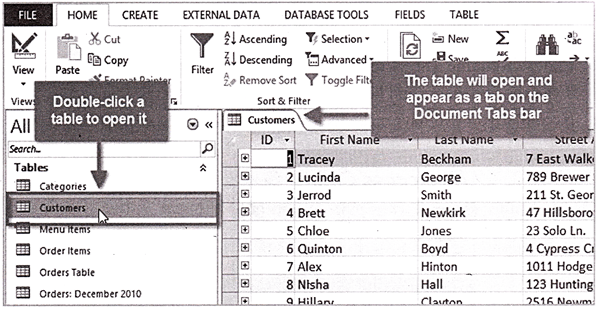
To open an existing table:
1. Open your database and locate the Navigation pane.
2. In the Navigation pane, locate the table you want to open. Tables are marked with the ![]() icon.
icon.
3. Double-click the desired table. It will open and appear as a tab in the Document Tabs bar.
Closing a Table
The best way to close access is to close the table first, database and access program itself. To close a table, (tables are contained in a database).
i. Click on the black cross X at the top right of the table window.

ii. Click on the office button File tab to display drop down list, select and click on Close Database.
iii. To close access, click the File tab, scroll down and select Exit.

Renaming a table
1. Right-click on the table that you wish to rename.
2. Choose Rename. (See Figure 5.10)
3. Type the new name and hit the Enter key to confirm the name.
4. Note that you will-have a chance to CTRL+Z to undo right away.

Delete tables from a database
Remember that if you delete a database table, you cannot undo the deletion, so you should back up your database before you proceed. For information about backing up your database, see the Back up your database before you edif or delete records section, earlier in this article.
1. If you have the table open in any view (such as Design view or Datasheet view), close it.
2. In the Navigation Pane, right-click the table and then click Delete on the shortcut menu.
Access asks you to confirm the deletion.
Click Yes.
If this table is related to one or more additional tables, Access asks if you want to delete those relationships.
3. Click Yes.
Access deletes any relationships and then deletes the table.
Creating form and reports
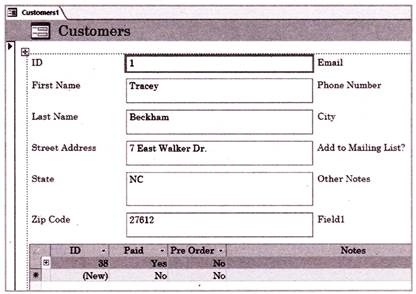
Access forms much like paper forms: you can use them to enter, edit or display data. They are based on tables. An access detailed form displays one record at a time and is used to edit this record. You can select which fields appears on the forms.
Two ways to switch views for the form are:
v On the Design ribbon, click the drop-down arrow under view and then click form view or layout view.
v In the status bar at the bottom of the Access window, click the form view or Layout view button.
Step to create form
1. In the Navigation pane, select the table you want to use to create a form. You do not need to open the table.
2. Select the Create tab, locate the Forms group and click the Form command.
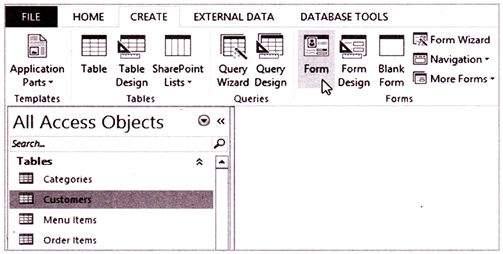
3. Your form will be created and opened in Layout view.
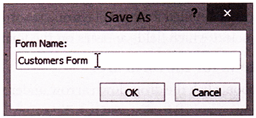
4. To save the form, click the Save command on the Quick Access toolbar. When prompted, type a name for the form, then click OK.
Reports
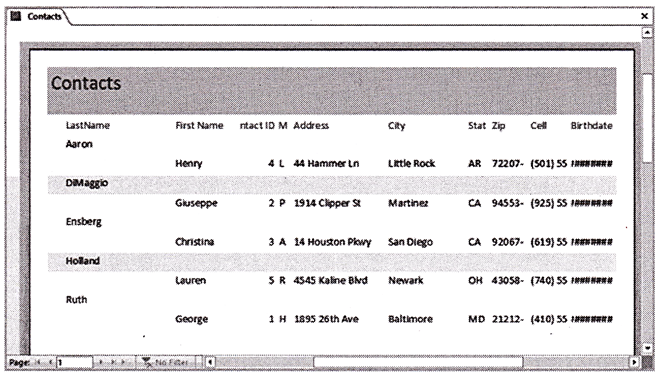
An access report can be used to present the data, charts, calculations and other information about the data in a format appropriate for printing. You can use a database table to create a simple report or mailing tables. If the reports uses data from multiple tables. It's easier to create a query first and then generate the report from the query.
1. On the Create tab in the Reports group, click Report Wizard. The wizard starts.
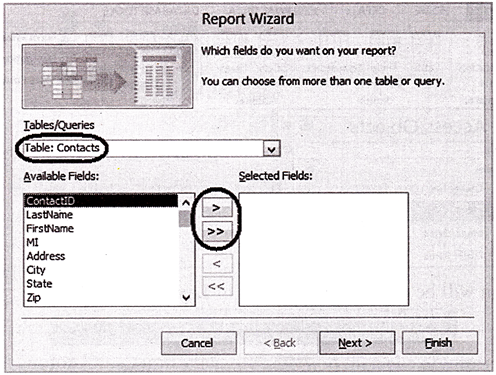
2. From the Tables/Queries drop-down list, select the table (or query) to base the report on. The fields for the selected table load in the Available Fields list box.
3. Move the fields to include on the report from the Available Fields list box to the Selected Fields list box. To do so, double-click a field name to move it or highlight the field name and click >. To move all fields at once, click>>.
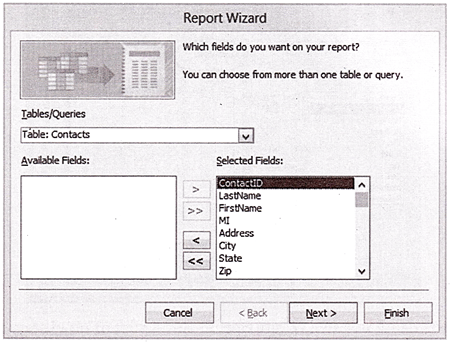
4. Click Next >.
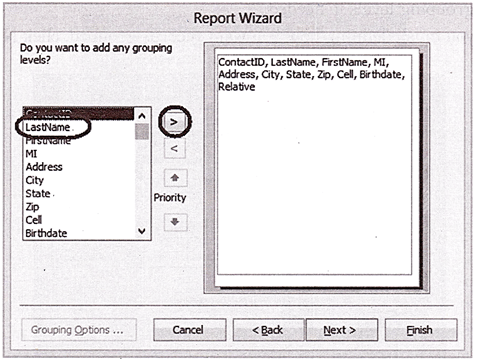
5. To group records on the report by a particular field, highlight the field in the list box and click >.
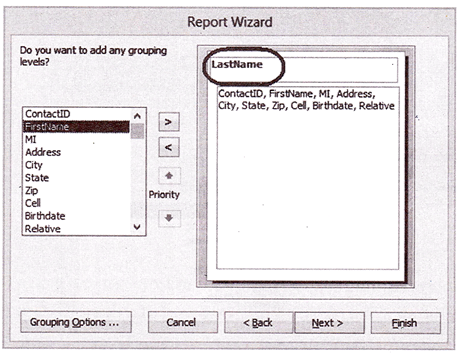
6. Add more grouping levels if desired. You can use the arrows to change the order of the grouping levels if needed.
7. When you finish defining how you want records grouped, click Next >.
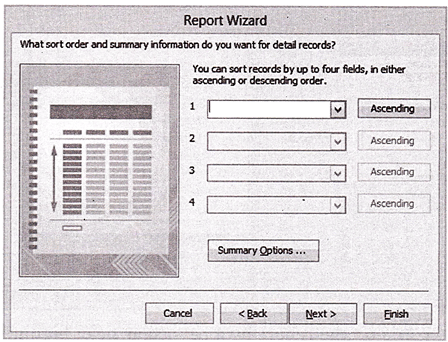
8. In the first drop-down list, select the field to sort records by. By default, records mil be sorted in ascending order by the field you select. If you want to sort in descending order, click the Ascending button to change its label to "Descending".
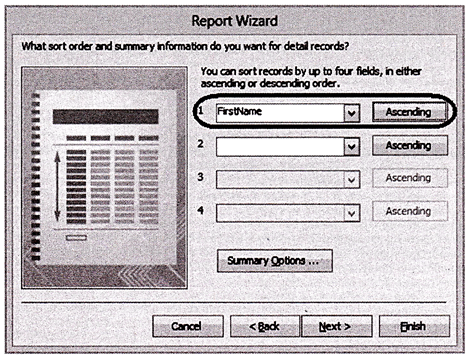
9. You can specify up to four levels of sorting. When you finish specifying sorting options, click Next >.

10. In the Layout field, select the format of the report. Your options are "Stepped", "Block" and "Outline". (Try the options to see a preview of the report layouts.)
11. In the Orientation field, select whether to lay out the report in portrait or landscape mode.
12. If you want all fields to fit on a single page, ensure the Adjust the field width so all fields fit on a page check box is marked.
13. Click Next >.

14. Enter a title for the report.
15. Select an option for the view you want to open the report in. Your options are:
v Preview the report (opens in Print Preview mode).
v Modify the reports design (opens in Design view).
16. Click Finish. The report loads in the view you selected.
Queries: An object that provides a custom view of data from one or more tables.
Creating a Query in Design View
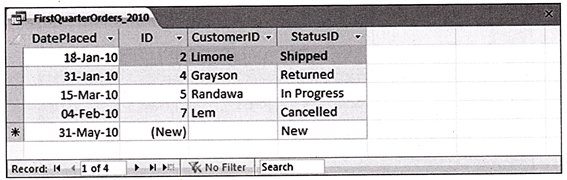
The best starting point for query creation is the Design view. The following steps show you how it works. (To try this yourself, you can use the Boutique Fudge.accdb database that's included with the downloadable samples for this appendix.) The final result----a query that gets the results that fall in the first quarter of 2010.
Here's what you need to do:
1. Choose Create![]() Queries
Queries![]() Query Design.
Query Design.
A new design window appears, where you can craft your query. But before you get started, Access pops open the Show Table dialog box, where you can choose the tables that you want to work with.
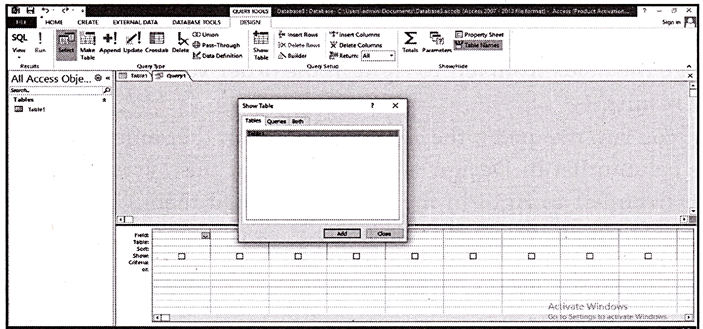
2. Select the table that has the data you want, and then click Add (or just double click the table).
In the Boutique Fudge example, you need the Orders table.
Access adds a box that represents the table to the design window. You can repeat this step to add several related tables, but for now stick with just one.
3. Click Close.
The Show Table dialog disappears, giving you access to the Design view for the query.
4. Select the fields you want to include in your query. To select a field, double- click it in the table box. Take care not to add the same field more than once, or that column shows up twice in the results. If you're using the Boutique Fudge example, then make sure you choose at least the ID, Date Placed, and Customer ID fields.
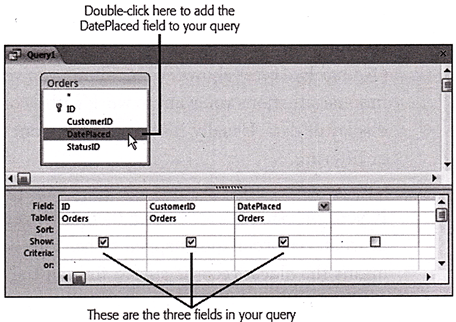
You can double-click the asterisk (*) to choose to include all the columns from a table. However, in most cases, it's better to add each column separately. Not only does this help you more easily see at a glance what's in your query, but it also lets you choose the column order and use the field for sorting and filtering.
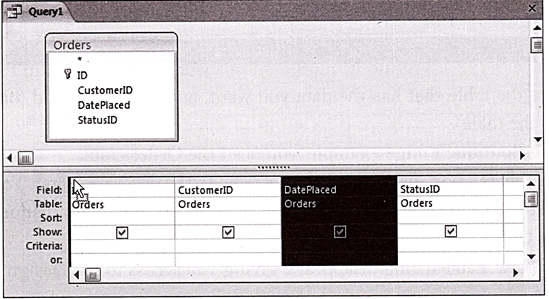
5. Arrange the fields from left to right in the order you want them to appear in the query results.
When you run the query, the columns appear in the same order as they're listed in the column list in Design view. (Ordinarily, this system means the columns appear from left to right in the order you added them.) If you want to change the order, then all you need to do is drag.
6. If you want to hide one or more columns, then clear the Show checkbox for those columns.
Ordinarily, Access shows every column you've added to the column list. However, in some situations you want to work with a column in your query, but not actually display its data. Usually, it's because you want to use the column values for sorting or filtering.
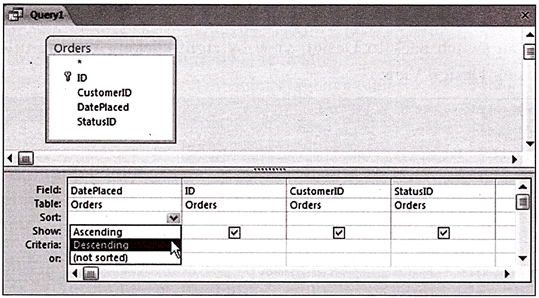
7. Choose a sort order.
If you don't supply a sort order, then you'll get the records right from the database in whatever order they happen to be. This convention usually (but not always) means the oldest records appear first, at the top of the table. To sort you table explicitly, choose the field you want to use to sort the results, and then, in the corresponding Sort box, choose a sorting option. In the current example, the table is sorted by date in descending order, so that the most recent orders are first in the list.
8. Set your filtering criteria.
Filtering is a tool that lets you focus on the records that interest you and ignore all the rest. Filtering cuts a large swath of data down to the information you need, and it's the heart of many a query. (You'll learn much more about building a filter expression in the next section.)
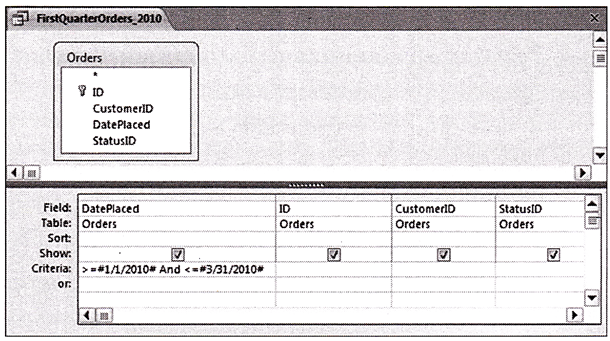
Once you have the filter expression you need, place it into the Criteria box for the appropriate field. In the current example, you can put this filter expression in the Criteria box for the Date Placed field to get the orders placed in the first three months of the year:
>=#1/1/2010# And <=#3/31/2010#
You aren't limited to a single filter?in fact, you can add a separate filter expression to each field. If you want to use a field for filtering but don't want to display it in the results, then clear the Show checkbox for that field.
9. Choose Query Tools [Design![]() Results
Results![]() Run.
Run.
Now that you've finished the query, you're ready to put it into action. When you run the query, you'll see the results presented in a datasheet (complete with lookups on linked fields), just like when you edit a table, (the result of the query on the Orders table.)
You can switch back to Design view by right-clicking the tab title and then choosing Design View.
10. Save the query.
You can save your query at any time using the keyboard shortcut Ctrl+S. If you don't, then Access automatically prompts you to save your query when you close the query tab (or your entire database). Of course, you don't need to save your query. Sometimes you might create a query for a specific, one-time-only task. If you don't plan to reuse the query, then there's no point in cluttering up your database with extra objects. The first time you save your query, Access asks for a name. Use the same naming rules that you follow for tables?refrain from using spaces or special characters, and capitalize the first letter in each word.


You need to login to perform this action.
You will be redirected in
3 sec

