Working With MS-Paint
Category : 3rd Class
Working With MS-Paint
Introduction
Microsoft Paint is a drawing tool that can be used for simple drawings and basic image editing.
MS-Paint has been included in every version of Microsoft Windows, starting with Windows 10 which was released in 1985.
Starting Paint Brush
Paint Brush is a program used to draw, color and edit pictures. You can use Paint Brush like a digital sketchpad to make simple pictures. Let us begin to work with Paint Brush.

To open Paint Brush
MS- Paint is a part of Windows. To open paint, the following steps should be follow:
v Click "Windows" button and select "Windows Accessories" folder option from the start menu.
v Click Paint option which is listed under the Windows Accessories folder.
Or
To open MS-Paint, Type Paint in the Search box on the task bar, and then select paint from the list of result.
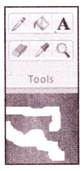
Using Tools
Using the different tools, you can create different shapes and give an artistic effect to your drawings.
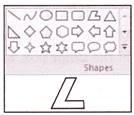
Shape Tools

The shapes use for Creating shapes in MS-Paint. The shape tool has 23 predefined shapes, 6 basic shapes, 6 polygon or star shapes, 4 arrows, 3 callouts shapes, 2 symbols.
The different shapes are selectable from the shapes group when the is active.
Basic shapes
v Oval
v Rectangle
v Rounded Rectangle
v Diamond
v Triangle
v Right Angle Triangle
Rounded Rectangle
Use Rounded Rectangle to draw rectangular shapes with rounded edges. Click Rectangle, click a Color in the Color box, and then click a fill style in the options box just below the toolbar.

The following are the steps:
v Click on the home tab, in the shapes group, click on the rounded rectangle tool.
Pencil Tool
Use the Pencil to draw thin, free-form lines or curves. Click Pencil, click a Color in the Color box, and then drag the pointer in the picture to draw. To draw using the background Color, right-click while you drag the pointer.

The following are the steps:
v On the Home tab, in the Tools group, click the Pencil tool.
v In the Colors group, click Color 1 (Foreground) color, choose a color, and then drag the pointer in the picture to draw.
v To draw using the Color 2 (background) Color, right-click while you drag the pointer.
Line Tool
Use the Line tool to draw a straight line. While using this tool, you can choose the thickness of the line, as well as the appearance of it.

The following are the steps:
v On the Home tab, in the Shapes group, click the Line tool.
v Click Size and then click a line size, which determines the thickness of the line.
v In the Colors group, click Color 1 (Foreground) color, choose a Color, and then drag the pointer to draw the line.
To draw a line that uses the Color 2 (background) Color, right-click while you drag the pointer.
v (Optional) To change the line style, in the Shapes group, click Outline, and then click a line style.
Eraser Tool
Use the Eraser to erase unwanted areas of your picture. Click Eraser, click an eraser size below the toolbox, and then drag the Eraser over the area of the picture that you want to erase. Any areas that you erase will be replaced by the background Color.
Steps are as follows:
v On the Home tab, in the Tools group, click the Eraser.
v Erase the area that you want to remove with the help of the mouse.
v Any areas that you erase will reveal the background Color (Color 2).
Polygon Tool
Suppose you want a star or a triangle in your drawing. In Paint Brush, you can even draw a polygon (a shape with many sides). You can use the Polygon tool to make a shape with any number of sides.
Follow the steps given below:
v On the Home tab, in the Shapes group, click the Polygon tool.
v To draw a polygon, drag the pointer to draw a straight line. Then, click each point where you want additional sides to appear.
v To create sides with 45° or 90° angles, press and hold the Shift key as you create each sides.
v Connect the last line to the first line to finish drawing the polygon and to close the shape.
Brushes Tool
Use the Brush to paint thick or shaped free-form lines and curves. Click Brush, click a shape just below the toolbar, click a Color in the Color box, and then drag the pointer to paint. To paint using the background Color, right-click while you drag the pointer.
Follow the steps given below:
v On the Home tab, click the down arrow under Brushes.
v Click the artistic brush that you want to use.
v Click Size, and then click a line size, which determines the thickness of the brush stroke.
v In the Colors group, click Color 1 (Foreground), Choose a Color, and then drag the pointer to paint.
v To paint using the Color 2 (background) Color, right-click while you drag the pointer.
Curve Tool
The curve tool is used to draw a smooth, curved line.
The following are the steps to use the curve tool:
v On the Home tab, in the Shapes group, click the Curve tool.
v Click Size, and then click a line size, which determine the thickness of the line.
v In the Colors group, click Color 1 (Foreground) , click a Color, and then drag the pointer to draw the line.
v To draw a line that uses the Color 2 (background) Color, right-click while you drag the pointer.
v After you have created the line, click the area in the picture where you want the arc of the curve to be, and then drag the pointer to adjust the curve.
Crop Tool
Use Crop to crop a picture so that only the part you selected appears in your picture. Cropping lets you change the picture so that only the selected object or person is visible.
The steps to crop an image is given below:
v On the Home tab, in the Image group, click the arrow under Select, and then click the kind of selection you want to make.
v Drag the pointer to select the part of the picture you want to show.
v In the Image group, click Crop.
v To save the cropped picture as a new file, click the Paint button, point to Save as, and then click the file type for the current picture.
v In the File name box, type a new file name, and then click Save.
v Saving the cropped image as a new picture file prevents overwriting the original picture file.
Rotate
It is used to rotate the whole picture or a selected part of it.
Depending on what you want to rotate, do any one of the following:
v To rotate the whole picture, on the Home tab, in the Image group, click Rotate, and then click the rotation direction.
v To rotate an object or part of a picture, on the Home tab, in the Image group, click Select. Drag the pointer to select the area or object, click Rotate, and then click the rotation direction.
Airbrush
Use the Airbrush to create an airbrush effect in the picture. Click Airbrush, click a spray pattern just below the toolbar, click a Color in the Color box, and then drag the pointer to paint. To paint using the background Color, right-click while you drag the pointer.
Text
Use Text to enter text in the picture. Click Text, and then, in the options box just below the toolbar, click a background style. Click a Color in the Color box, and then click in the picture and type your text. You can resize and move the text box, and change the font, font size, and text formatting until you click another tool or click outside the text box within the picture.
Select tool
Use the Select tool to select part of the picture that you want to change.
The following are the steps to use select tool:
1. On the Home tab, in the Image group, click the down arrow under Select.
Do one of the following, depending on what you want to select.
v To select any square or rectangular part of the picture, click Rectangular selection, and then drag the pointer to select the part of the picture you want to work with.
v To select any irregularly shaped part of the picture, click Free-form selection, and then drag the pointer to select the part of the picture you want to work with.
v To select the whole picture, click Select all.
v To select everything in the picture except for the currently selected area, click Invert selection.
v To delete the selected object, click Delete.
Determine if the Color 2 (background) Color is included in your selection by doing the following:
Saving a Drawing
You must save your picture frequently to ensure that you do not accidentally lose your work. This saves all of the changes you made to the picture since the last time you saved. The very first time that you save a new picture, you need to give your picture a file name.
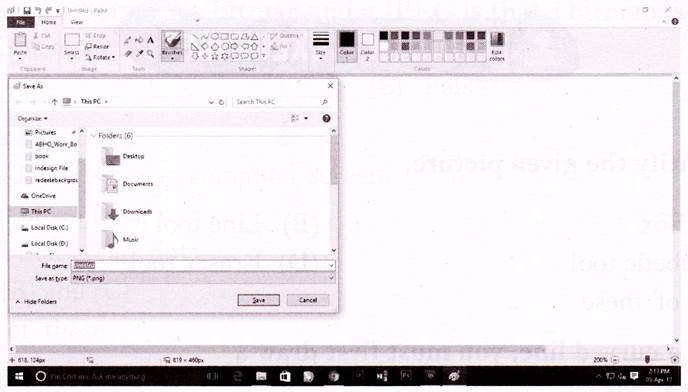
Follow the steps given below:
v Click on the office button, click save.
v In the Save as type box, select the file format you want.
v In the File name box, type a name.
v Click Save.
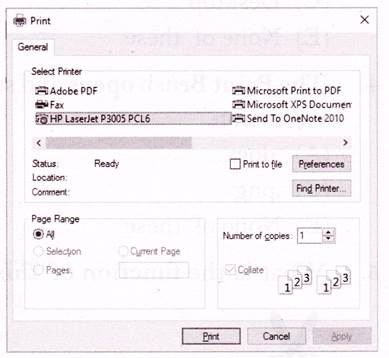
Printing
A copy of your drawing can be printed, either as a full image or as a section of the image.
To print an image perform the following steps:
v Select the Print option from the Office button.
v The Print dialog box appears. Select the options you want (such as the number of copies and whole or partial image) and then select OK.


You need to login to perform this action.
You will be redirected in
3 sec

