Microsoft Office
Category : Banking
Microsoft Office
Microsoft Office is an office suite of interrelated desktop applications servers and services for the Microsoft Windows. It is a horizontal market software that is used in a wide range of industries. Microsoft Office was introduced by Microsoft in 1989 for Macintosh. Again it introduce Windows in 1990. After that many new versions were released. Microsoft Office for Windows 1.0 started in October 1990 with three applications Microsoft Word for Windows 1.1, Microsoft Excel for Windows 2.0, and Microsoft PowerPoint for Windows 2.0. In 1994, Microsoft Office 4.0 was released containing Word 6.0, Excel 5.0, PowerPoint 4.0, Mail, and Access. More versions are Microsoft Office 95, Microsoft Office 97, Microsoft Office 2000, Microsoft Office XP, Microsoft Office 2003, Microsoft Office 2003, Microsoft Office 2007, Microsoft Office 2010, Microsoft Office 2013 and
Microsoft Office 2016.
Microsoft Word: Microsoft Word is a popular word processing package which provides facilities to write common letters to desktop publishing. This means that it is useful for typing and storing letters, articles, broachers, tests, Quizzes and anything that consists mainly of words. Many organizations now use computers to produce and organize written material, correspondence, membership lists and so on. These are possible with the most common program MS-Word that is used on most computers. It provides an incredibly powerful tool to create and share documents.
To Open or Start Microsoft Word: There are two methods to open or start Microsoft Word. Double click on Microsoft Word icon on desktop. Click on the Start button in the bottom left hand corner of computer screen. When the menu pops up, move our mouse up to Programs. A sub menu will appear showing all the software we have. Now click Microsoft office then select Microsoft Word from them. Microsoft Word will start up.
Click Start >> Program >> MS-Office >> MS-Word
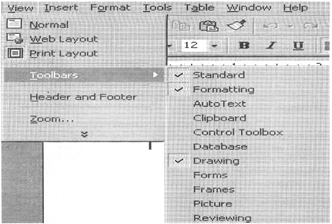
Viewing the Toolbar
In Microsoft Word the toolbar is the line of boxes and symbols that are shortcuts of many commands and appear across the top of the computer screen. It increases the working capacity of a user. We may recognize it by the picture of a file folder, scissors, and paint brush etc. If the toolbar does not appear at the top of the screen, pull down the I View menu in Menu bar and select Toolbars. In the Toolbars dialog box, click standard, formatting, drawing and then OK. In all toolbars a standard toolbar is used more than others, the standard toolbar has tools such as New, Open, Close, Save, Spelling and Grammar etic and Formatting toolbar has tools such as Font Style, Font Name, Font Size, Margin, Paragraph and Bullets etc. When we format a document, we change its appearance.
Creating a document: When we create a document, we enter text or number, insert images and perform other tasks using input devices. To create a document we start word, a new document window opens. This is a blank page, where we start typing. After the first page gets over we automatically go to the next page.
Another method to create a new document:
1. On the File menu from Menu bar, click New
2. Select the Blank Document in pull-down menu
Save a Document: After we create or edit a document, we try to save it. A command that saves our work on into the hard drive, or onto a disk is save. When we save a document, the computer transfers the document from memory to a storage medium such as hard disk or USB Hash drive. A saved document is referred to as a file. Hence, to save any file.
1. Select File option from Menu bar, click Save.
2. Select the location or drive to store a file and enter a name for the file or filename in the File name box.
3. Click Save.
A file name is a unique name that a user gives to a file, but two different files can have the same name if they are in different folders. In Microsoft Word .doc is file name extension by default. Filename extension represent a file type such as .bas for Basic source code file, .him for Hypertext Markup Language file, .bat for DOS batch file and .doc for word document file etc.
3. Close a Document: When we want to close a document without leaving the application, we use on the File menu from Menu bar, click close.
Editing a document: We can open a document and modify it the way we want. It can be possible by using the Edit features in word such as Cut, Copy and Paste etc. To edit a document means to make changes to its existing content. Cut is the process of removing a portion of the document and storing it in a temporary storage location, called a clipboard. Paste is a process of transferring an item from a clipboard to a specific location in a document. Editing a document consists of reading through the document created by a user and correcting the errors. The edit buttons are also found in standard tool bar. After editing document must be saved again to store the changes.
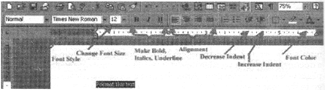
Formatting Text: When we format a document, we change its appearance. We can format a text by changing fonts, font size, and font style etc. A font is a name assigned to a specific design of characters. Font size indicates the size of characters in a particular font. Font style adds emphasis to a font, Bold, Italic, Underline and color. MS-Word provides a wide variety of text formatting, which add a professional look to documents.
1. Select or highlight the text by holding down left mouse button click which we want to format.
2. Go to the Format toolbar menu and select buttons such as Font tab, Font, Font Style, Font Size, Font color, Bold, Italics and Underline etc. Which we want to use.
Inserting a table: Tables are an easy way to arrange data in a Word document. With tables, we can align data in columns and rows easily. There are many ways to insert tables in Word document. (Numbers and text in table columns are usually left aligned).
1. To insert a table click the Insert Table toolbar button when our cursor is positioned at the place in our document where we would like the table.
2. A grid will pop up allowing to select how many rows and columns we would like in table.
3. After selecting the number of rows and columns, click on OK. A table will be inserted.
4. While this method will create a table with uniform columns and rows, we can still customize a table.
Inserting a picture
1. To insert a picture click the Insert option in Menu bar when cursor is positioned at the place in the document where we would like to insert a picture.
2. Select a Picture option in pull-down menu.
3. Select a Clip art or From File.
4. Select a picture and click insert.
Inserting page number and date/time
1. To insert a picture, click the 'Insert' option in Menubar
2. Select one by one 'Page Number' and 'Date and Time'.
Spell check in document
The spell check looks for spelling mistakes in the text area. To remove spelling and grammar mistakes in a document we use an Auto spellcheck tool. It indicates the wrong word by underlining it.
1. With the document open, click the Check Spelling and Grammar tools.
2. If a spelling error is found, window opens with suggested corrections
3. To accept the default correction, click Replace. If the initial suggestion I not the correct word, click on the correct word in the list of suggest! Owns or enter the word into the Replace with field, then click the Replace button.
4. Repeat these steps to correct all spelling errors. When there are more errors/ the message Spell check complete appears.
5. Click OK to return to editing the document.
File operations in word
Opening a document: To open a document or get a file from the memory where it was stored we use Open command. It retrieves a saved document from computers memory and bring it up on the screen to view. To open a document, complete the following steps -
Select File option from Menu bar.
1. Click on the Open option in pull-down menu.
2. Click on the file from the available list.
3. Click on Open button.
Copy a document:
The copy function can create a new copy of a document. To copy a document, complete the following steps -
1. Select File option from Menu bar.
2. Click on the Open option in pull-down menu.
3. Find the document that we want to copy.
4. Select the document, then Right click. We get a pull-down menu where we select Copy option. It creates a copy of the document and places it on the clipboard.
5. Find the folder where we want to place the copy, then click Paste We can place a document copy in the same folder or a different folder.
The document copy is now placed in the selected folder, with the name
"Copy of "
Send a document: In order to e-mail a word document from within -
1. Select file option from menu bar.
2. Select the option send to/mail recipient.
Move a document
We use the move functions to rearrange and create new documents. The move function deletes the document in the original location and pastes it into a new location. The move function canal move a folder, including all the documents in that folder. To move a document, complete the following
Steps?
1. Select file option from menu bar.
2. Click on the open option.
3. Find the document that we want to move.
4. Select the document, then right click. We get a pull-down menu where we select cut option.
5. Find the folder where you want to place the moved document, then click Paste.
Rename a document
To rename a document, complete the following steps?
1. Select File option from menu-bar.
2. Click on the open option in pull-down menu.
3. Find the document that we want to rename.
4. Select the document, then right click.
5. We get a pull-down menu where we select Rename option
6. Give the new name to a file and press Enter.
To save a file into new location with new name we use 'save as' option in File option from menu-bar.
Delete a document
Deleting a document removes the document permanently. To delete a document, complete the following steps_
1. Select file option from menu bar.
2. Click on the open option in pull-down menu.
3. Find the document that we want to delete.
4. Select the document, then right click.
5. We get a pull-down menu where we select delete option.
Undo and Redo
Every time the document is changed, we save the previous state on list. To undo, we take the data at the current position in the list, and use it to restore the document. We also need to save the document state before we restore it. This enables us to redo. To delete a document, complete the following steps -
1. Press arrow mark of "Undo" button in the standard toolbar and we get a list of current work which we can undo.
2. If we do not want modification done by undo/ then press "Redo" to get back.
Page preview: can see all pages of documents in page preview mode but cannot edit the document.
Print a document
Print is a command that takes what has been typed and can be seen on the screen and sends it to the printer for output on paper. When we print a document, the computer prints the contents of the document on paper. By default it prints in portrait mode. To print a document, complete the following steps ?
1. Select file option from menu-bar.
2. Click on the print option in pull-down menu.
3. We get a print dialog box where we fill the needed information and after that click ok. Finally we get a print of a document.
Create a header and footer: Sometimes we want some information to appear on every page. This information would normally appear either in top or bottom of the page.
We can insert it by using Header and Footer option. To create a header and footer, we can take the following steps-
1. Open an existing document and select view option of the menu bar.
2. Click on the Header and Footer option.
3. Click on Insert Page Number on the "Header and Footer" toolbar to insert page number on the header.
4. Click on Insert Date icon on the 'Header and Footer" toolbar to insert date on the header.
5. Click on Insert Time icon on the 'Header and Footer" toolbar to insert time on the header.
6. Click on 'Switch between header and footer" to create a footer and repeat step.
7. Click 'Close header and footer" on header and footer toolbar.
Insert a picture from the clipart
1. Move the cursor where we want clip art.
2. Click on 'Insert Clip-art" of drawing toolbar.
3. Click on picture that we want to insert.
4. Close the clip art gallery.
Text operations in MS-Words
Find text: To find text in a document, complete the following steps -
1. Select edit option from menu bar.
2. Click on the find and replace option in pull-down menu.
3. Type the text in Find what window which we want to find.
4. Click on find next button.
5. Cursor will be placed at the first occurrence of the text.
6. Click on find next button to get the next occurrence.
Find and Replace: a text Find and Replace is the easiest way to locate and change a particular word or phrase in a document and modify it. To
Find and Replace a text in a document, complete the following steps -
1. Select edit option from menu bar.
2. Click on the find and replace option in pull-down menu.
3. Type the text in Find what window which we want to find and replace.
4. Click on Replace tab.
5. Type the text in the replace with text box.
6. Click on Replace button if we want to replace the text at only on place or Click on Replace All button if we want to replace the text all over document.
Autocorrect Text: The autocorrect feature in word automatically corrects certain spelling, typing, and capitalization or grammar errors.
Change case: Sometimes we type a document in capitals by mistake. Rather than retyping the whole section we can take the following stapes -
1. Select or highlight a text.
2. Go to Format option in Menu bar.
3. Go to Change case and select any option from sentence case, lower case and uppercase. It will correct it.
Sentence case. Lower case and Uppercase. It will correct it. Sentence case: It changes first letter of sentence into capital letter and rest changes in small letter. Lower case: It changes all letters into small letters.
Lower case: It changes all letters in to small letters.
Uppercase: It changes all letters into capital letters.
Delete Text: Deleting text means removing text and other contents.
Table - I: Standard toolbar
|
Tools name |
Keyboard Operation |
Description |
|
New Blank Document |
CTRL + N |
Creates a new blank document based on the defaults templates. |
|
Open File Menu |
CTRL + O |
Opens a find a file. |
|
Save (File Menu) |
Ctrl + S |
Saves the active file with its current file name, location and file format. |
|
Mail Recipient |
|
Sends document as e-mail body. |
|
Print (File Menu) |
Ctrl + P |
Prints the active file: for more print options go to the File Menu and Select Print. |
|
Print Preview (File Menu) |
Ctrl + F2 |
Print Preview: Shows how the document will look when you print it |
|
Spelling and grammar |
F7 |
Spelling, grammar and writing style checker. |
|
Cut (Edit Menu) |
CTRL+ X |
Cut: Removes the selection from the document and places it on the clipboard. |
|
Copy (Edit Menu) |
Ctrl + C |
Copies the selected item(s) to the clipboard |
|
Paste (Edit menu) |
CTRL+V |
Places the content of the clipboard at the insertion point. |
|
Undo point |
CTRL+ Z |
Reverses the last command, uses pull-down menu to undo several steps. |
|
Redo (Edit Menu) |
Ctrl + Y |
Reverses the action of the Undo button, uses the pull-down menu to redo several steps. |
|
Hyper-link |
CTRL + K |
Inserts hyperlink and displays the destination object, document or page. |
|
Tables and Borders |
|
Display the tables and border toolbar. |
|
Insert table |
|
Insert a table into the document, or makes a table of a selected text. |
|
Insert Excel Worksheet |
|
Inserts an Excel Spreadsheet into the Word Document. |
|
Zoom |
|
Enlarges or reduces the display of the active document. |
|
Office Assistant |
F1 |
Provides help and tips to accomplish our task. |
|
Format painter |
|
Copies the format from a selected object or text and applies to other objective or text. |
Table - II: Formatting Toolbar
|
Tools Name |
Keyboard Operation |
Description |
|
Style
|
Ctrl + Shift + S |
Selected the style to apply to paragraphs. |
|
Font |
Ctrl + Shift + F |
Change the font of the selected text. |
|
Font Size |
Ctrl +Shift + P |
Change the size of the selected text and number. |
|
Bold |
Ctrl + B |
Make selected text and numbers bold. |
|
Italic |
Ctrl + I |
Makes selected text and number Italic. |
|
Underline |
Ctrl+ U |
Underline selected text and numbers. |
|
Align left |
Ctrl+ L |
Aligns to the left with a ragged left margin. |
|
Center |
Ctrl+ E |
Center the selected text |
|
Align Right |
CTRL + R |
Align to the right with a ragged left margin. |
|
Justify |
Ctrl+ J |
Align the selected text to both the left and right margins. |
|
Numbering |
|
Makes a Numbers list or reverts back to normal. |
|
Bullets |
|
Adds or removes bullets in a selected paragraph. |
|
Decrease Indent |
|
Decreases the indent to the previous tab stop. |
|
Increase Indent |
|
Indent the selected paragraph to the next tab stop. |
|
Outside Borders |
|
Adds or removes a border around selected text or objects. |
|
Highlight |
|
Marks text so that it is highlight and stand out. |
|
Font color |
|
Format the selected text with the color we click. |
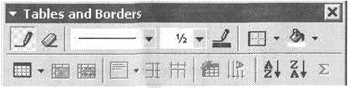
Table - III: Table and Border Toolbar
|
Table Name |
Description |
|
Draw table |
Create a table by inserting horizontal and vertical lines using the mouse. |
|
Eraser |
Deletes unnecessary lines and borders from a table. |
|
Line Weight |
Assigns a line weight or thickness of the line of the border for the next table or line drawn or inserted. |
|
Line Style |
Assigns a style of border for the next table or line drawn; |
|
Border Color |
Chooses from the color palette the color of the border for the next table or line drawn. |
|
Outside Border |
Assign border or lines to the selected table cells. |
|
Fill Color |
Fills color for the selected table cells or change the prior color. |
|
Insert Table |
Inserts a table into the document or into an existing table. |
|
Merge Cells |
Combines the selected cells within a row or column into one cell. |
|
Split Cells |
Splits the selected cells into the specified number of row and columns. |
|
Align top left |
Aligns top left the contents of the selected cells. |
|
Distribute Row Evenly |
Adjusts all the rows in the current selection to the row height. |
|
Distribute Columns Evenly |
Adjusts all the columns in the current selection to the same width. |
|
Table Auto |
Display the Table Auto Format dialog box. |
|
Change Text Direction |
Change the text orientation. |
|
Sort Ascending |
Sorts the contents of the selected cells into Ascending order (A to Z). |
|
Sort Descending |
Sorts the contents of the selected cells into descending orders (Z to A). |
|
Auto Sum |
Insert a formula field into the active cells containing the sum of the cell Above or the left of this cells. |
Table - IV: Drawing Table
![]()
|
Tools name |
Description |
|
Draw |
A pull down menu with several drawing options. |
|
Select Objective |
Changes the pointer to a selection arrow. |
|
Free Rotate |
Rotates the selected objective to any degree. |
|
Auto Shapes |
A pull down menu with several libraries of shapes. |
|
Line |
Draws a line where you click and drag. Holds the Shift key down to make the line straight. |
|
Arrow |
Inserts a line with an arrowhead where you click and drag. |
|
Rectangle |
Draws a rectangle where you click and drag. Holds down Shift to draw a square. |
|
Oval |
Draws an oval where you click and drag. Holds down Shift to draw a circle. |
|
Text Box |
Draw a text box where you click and drag. |
|
Word Art |
Create a text effects with Word Art. |
|
Fill color |
Adds, modifies or remove filled color from a selected object. |
|
Clip Art |
|
|
Font color |
Formats the selected text with color you click. |
|
Line color |
Adds, modifies or removes lines color. |
|
Line style |
Change the thickness of lines. |
|
Dash style |
Selects dash style for dashed lines. |
|
Arrow style |
Selects arrow style; placement and shape of arrowhead. |
|
Shadow |
A pull down menu offers shadow choices. |
|
3-D |
Add 3-D effects to rectangles or ovals. |
Footnote and Endnote: Footnote is a term used to describe additional information found at the bottom of a page and endnote is additional information at the end of the document.
Within Microsoft Word move the cursor to where you want to insert the number that points to the footnote.
1. Select Insert option from Menu bar
2. On the Insert menu, click Footnote.
3. Specify whether or not you wish to insert a Footnote or Endnote and click on.
By default, Word places footnotes at the end of each page and endnotes Nat the end of the document.
The Ruler: The ruler is generally found below the main toolbars. The ruler is used to change the format of your document quickly.
To display the ruler
1. Click view on the menu bar.
2. The option Ruler should have a check mark next to it. If it has a check mark next to it, press Esc to close the menu. If it does not have a check mark next to it, continue to the next step.
3. Click Ruler. The ruler now appears below the toolbars.
View a document: In Word, we can display our document in five views
1. Normal View: Normal view is the most often used and shows formatting such as line spacing, font, point size, and italics.
2. Web Layout: Web layout view enables us to view our document as it would appear in a browser such as Internet Explorer.
3. Print Layout: The Print Layout view shows the document as it will look when it is printed. It is also called page layout.
4. Reading Layout: Reading Layout view formats our screen to make reading our document more comfortable.
5. Outline View: Outline view displays the document in outline form. Headings can be displayed without the text. If we move a heading, the accompanying text moves with it.
Text Area: Text area is a large area at just below the ruler. We type document in the text area. The blinking vertical line in the text is the cursor which shows our position. It marks the insertion point of text. As we start type, our work shows at the cursor location.
Meaning of different colors underlines in document
If text on our document is underlined, without applying underline formatting to it, could be of the following reasons.
1. Red and green wave underlines: When we automatically check spelling and grammar, Microsoft Word uses wavy red underlines to indicate possible spelling errors and wavy green underlines to indicate possible grammatical errors.
2. Blue wavy underlines: Word uses wavy blue underlines to indicate possible instances of inconsistent formatting.
3. Blue or other color underlines: Hyperlink display text is blue and underlined by default.
Word wrap: is the additional feature of most text editors,
Word warp: processors and web browsers of breaking lines between and not within words, except when a single word is longer than a line.
Exit from MS-word: When we have completed and saved our work we exit from MS-Word. To exit from Word
1. Select File option from Menu bar.
2. Click on the Exit in pull-down menu.
If we have typed any text, we will be prompted" Do you want to save your changes" To save our changes, click yes otherwise, click No.
1. Specify the correct folder in the Save In box.
2. Name our file in the File Name field.
3. Click Save.
Microsoft Excel: is an electronic spreadsheet. It is a tool for numeric and statistical calculation, evaluation, analysis, and it also offers capabilities for creating charts, reports and presentations to communicate what analysis reveals. It is used by people to perform quick numeric calculations, store and analysis data periodically, for preparing financial statements and tax worksheet. A program that works like a calculator for keeping track of money and making budgets. It is a program that works like a calculator for keeping track of money and making budgets. It is a utility software package.
Microsoft Excel is a logical worksheet consisting of cells organized into nova and columns. A cell is the intersection of a row and a column. In which we can enter a single piece of data. The data is usually text, a numeric value, or a formula. The entire spreadsheet is composed of rows and columns of cells. Each row and column creates a unique cell. Each cell refers to a cell reference, or cell address, that is the row and column label of cells, cell address is a unique co-ordinate system used to identify a specific cell. Cell address contains first column then row's name. They identified by a column letter and a row number of a cell, such as C4 or D8. Each cell is displayed on the screen as a rectangular shape which can store text, value, or a formula. Once formula is specified, calculations are done automatically and the results are displayed for the user to see. Often text is left align in column, we can change it according to our need. A workbook is the MS Excel file in which we enter and store related data in worksheet. A worksheet is also known as a spreadsheet that is a collection of cells on a single "sheet" where we actually keep and manipulate the data. Each workbook can contain many worksheets.
There are some examples of electronic spreadsheets
1. Lotus 1-2-3
2. Quartpro
3. VPP
4. MS-Excel
To Open or Start Microsoft Excel: There are two methods to open or start Microsoft Word.
1. Double click on Microsoft Excel icon on desktop.
2. Click on the Start button in the bottom left hand corner of computer screen.
3. When the menu pops up, move our mouse up to Programs. A sub menu will appear showing all the software we have.
4. Now click Microsoft office then select Microsoft Excel from them Microsoft Excel will start up.
Click Start
![]()
Program
![]()
MS-Office
![]()
MS-Excel
Creating Formula
1. Start Microsoft Excel and open the file.
2. Double-click on the cell where you want to insert the formula.
3. Type = key on the keyboard. This tells Excel that we are entering a formula into the cell. ![]()
4. Enter the formula, then press Enter to accept the formula.
5. We can also enter a formula into a range of cells by copying a formula from another cell.
Adding borders to a cell: To add borders to cells, follow these steps
1. Select the cell or range of cells that we want bordered.
2. Select the Cells option from the Format menu. We will get the format cells dialog box.
3. Click on the Border tab.
4. In the Border section of the dialog box, select where you want the border applied. (Outline will surround the entire cell or cell range.)
5. Select a line type from the Style area.
6. Click on OK.
Adding shading to a cell: To add shading to cells, follow these steps
1. Select the cells or ranges of cells that we want to apply shading.
2. To fill cells with a solid color, click the arrow next to Fill Color on the Formatting toolbar and then click the color that you want on the palette.
3. To apply the most recently selected color, click Fill Color.
4. To fill cells with a pattern, click Cells on the Format menu. On the Patterns tab, under Cell shading, click the background color that you want to use for the pattern. Then click the arrow next to the Pattern box, and click the pattern style and pattern color.
Inserting a chart in Spreadsheet: Charts are used to display series of numeric data in a graphical format to make it easier to understand large quantities of data. To create a chart in Excel, you start by entering the numeric data for the chart on a worksheet.
1. On the -worksheet, arrange the data that you want to plot in a chart.
The data can be arranged in rows or columns.
2. Select the cells that contain the data that you want to use for the chart,
3. Click on the Insert, then click the chart option in drop-down menu. Chart Wizard will appear on computer.
4. Chard Wizard is now asking for Chart Type, Data Range etc.
5. After selecting and updating in Chart Wizard, click finish.
Some Excel Function are -
CLEAN: Removes all non-printable characters from a supplied text string.
TRIM: Removes duplicate spaces and spaces at the start and end of a text string.
LOWER: Converts all characters in a supplied text string to lower case.
PROPER: Converts all characters in a supplied text string to proper case (i.e letters that do not follow all other characters are lower case).
UPPER: Converts all characters in a supplied text string to upper case.
LEFT: Returns a specified number of characters from the start of a supplied text string.
MID: Returns a specified number of characters from the middle of a supplied text string.
RIGHT: Returns a specified number of characters from the end of a supplied text string.
KEPT; Returns a string consisting of a supplied text string repeated a specified number of times.
TEXT JOIN: Joins together two or more text strings, separated by a delimiter (New in Excel 2016 not available in Excel 2016 for Mac).
LEN: Returns the length of a supplied text string.
FIND: Returns the position of a supplied character or text string from within a supplied text string (case-sensitive).
SEARCH: Returns the position of a supplied character or text string from within a supplied text string (non-case- sensitive).
EXACT: Tests if two supplied text strings are exactly the same and if so, returns TRUE; Otherwise, returns FALSE (case-sensitive).
T: Tests whether a supplied value is text and if so, returns the supplied text. If not, returns an empty text string
REPLACE: Replaces all or part of a text string with another string (from a user supplied position).
SUBSTITUTE: Substitute all occurrences of a search text string, within an original text string. With the supplied replacement text.
AND: Tests a number of user-defined conditions and return TRUE if ALL of the conditions evaluate to TRUE or FALSE otherwise.
OR: Tests a number of user defined conditions and returns TRUE if ANY of the conditions evaluate to TRUE or FALSE otherwise.
XOR: Returns a logical Exclusive or of all arguments (New in Excel 2013).
NOT: Returns a logical value that is the opposite of a user supplied logical value or expression (i.e. returns FALSE is the supplied argument is TRUE and returns TRUE if the supplied argument is FALSE).
TRUE: Returns the logical value TRUE.
FALSE: Returns the logical value FALSE.
DATE: Returns a date, from a user supplied year, month and day.
TIME: Returns a time, from a user supplied hour, minute and second.
SUM: Returns the sum of a supplied list of numbers.
PRODUCT: Returns the product of a supplied list of numbers.
POWER; Returns the result of a given number raised to a supplied power.
SQRT: Returns the positive square root of a given number.
ROW: Returns the row number of a supplied range, or of the current cell.
COLUMN: Returns the column number of a supplied range, or of the current cell.
ROW: Returns the number of rows in a supplied range.
COLUMN: Returns the number of columns in a supplied range.
AREAS: Returns the number of areas in a supplied range.
COUNT: Returns the number of numerical values in a supplied set of cells or values.
COUNT A: Returns the LARGEST value from a list of supplied numbers, for a given value.
SMALL: Returns the SMALLEST value from a list of supplied numbers, for a given value K.
MAX: Returns the largest value from a list of supplied numbers.
MIN: Returns the smallest value from a list of supplied numbers.
SUB TOTAL: Performs a specified calculation (the sum, product, average etc.) for a supplied set of values.
MOB: Returns the remainder from a division two Supplied numbers.
EVEN: Rounds a number away from zero (i.e. rounds a positive number up and a negative number down), to the next even number.
FLOOR: Rounds a number towards zero, (i.e rounds a positive number down and a negative number up), to a multiple of significance.
ODD: a number away from zero (i.e rounds a positive number up and a negative number down), to the next odd number.
ROUND: Rounds a number up or down to a given number of digits.
CHAR: Returns the character that corresponds to a supplied numeric value.
Microsoft Power point: Microsoft Power point is a part of MS- Office. It was introduced to generate business presentation, slide show and graphics on computer system.
Use of Power point
1. Creating business application presentation slide.
2. Creating graphical objects with animations.
3. Create artistic slides for general use using art gallery.
4. To provide training in business world.
Starting Power point: There are two methods to open or start Power point.
1. Double click on Microsoft Power point icon on desktop.
2. Click on the Start button in the bottom left hand comer of computer screen.
3. When the menu pops up, move our mouse up to Programs. A sub
Menu will appear showing all the software we have.
4. NOW click Microsoft office then select Microsoft Power point from them Microsoft power will start up:
CLICK \[\xrightarrow{{}}\] PROGRAM \[\xrightarrow{{}}\] MS-OFFICE \[\xrightarrow{{}}\]MS- POWER POINT
The Power Point Screen
We use Power Point to create effective slide show presentations. The power point screen has many elements.
1. Title Bar: The title bar generally appears at the top of the screen. The title bar displays the title of the current presentation.
2. Menu Bar: The menu bar displays the menu. You use the menu to give instructions to Power Point.
3. Standard and Formatting Toolbars: Power Point has several toolbars. Toolbars provide shortcuts to menu commands. The most commonly used toolbars are the standard and formatting toolbars. You use the standard toolbar to do such things as open a file; save a file; print a file; check spelling; cut, copy, and paste; undo and redo; or insert a chart or table. You use the formatting toolbar to change the font, font size or font color; bold, underline or italicize text; left align, right align center, or justify, bullet or number lists; highlight; or decrease or increase the indent.
4. Rulers: Rulers are vertical and horizontal guides. You use them to determine where you want to place an object. They are marked in inches.
5. Placeholders: Placeholders hold the objects in your slide. You use placeholders to hold text, clip art, and charts.
6. Status Bar: The Status bar generally appears at the bottom the screen. The States bar displays the number of the slide that is currently displayed, design template in use or the name of the background.
7. Outline Tab: The Outline displays the text contained in your presentation.
8. Slides Tab: The Slides tab displays a thumbnail of all your slides. You click the thumbnail to view the slide in the slide pane.
9. View Bottoms: The view buttons appear near the bottom of the screen. You use the view buttons to change between Normal views. Slider sorter view, and the Slide Show.
10. Drawing Toolbar: The drawing toolbar generally appears near the bottom of the screen. It contains tools for creating and editing graphics.
11. Common Tasks Buttons: Using the common tasks buttons, you can select the type of tasks you want to perform.
12. Task Pane: The task pane enables you to select the specific task you want to perform.
13. Vertical Splitter Bar: You can click and drag the vertical splitter bar to change the size of your panes.
14. Minimize Button: You use the minimize button to remove a window from view. While a window is minimized, its title appears on the taskbar.
15. Maximize / Restore Button: You use the maximize button to cause a window to fill the screen. After you maximize a window, if you click the restore button, the window returns to its former size
16. Close Button: You use the close button to exit the window and close the program.
Create a new presentation
We can create a new presentation in many ways. It will cover everything from creating a simple blank presentation to one that is created from our favorite photograph.
1. Auto Content Wizard: It creates new presentation by providing information about title, subject, style and output. It will help to create presentations quickly by asking a number of questions about what user want and then create a presentation based on answers. A user can modify the contents of the presentation according to his needs once he has finished.
2. Design Template: It is created so that different slide types can have different layouts and graphics, the whole presentation goes together as an attractive package. It creates new presentation based on provided power point design template.
3. Blank presentation: It is displayed as blank presentation to create own design. It starts with a blank presentation with all values for color scheme, fonts and other design features set to default value. After selecting blank presentation abuser selects layout from layouts window.
These layouts are of different types
1. Blank slide
2. Title slide
3. Bulleted list
4. Two column text
5. Table
6. Text and char
7. Chart and text
8. Organizational chart
9. Chart
10. Text and clip art
11. Clip art and text
12 Title only
To save a presentation: When we create a presentation, it needs to save. So to save a presentation.
1. Select File option from Menu bar, click Save.
2. Select the location or drive to store presentation and enter a name in the File name box.
3. Click Save.
To save a presentation into new location with new name we use 'Save as" option in file option from menu-bar. Different Ways to View Slides: Slides in any power point presentation can be viewed in a variety of ways depending on the task.
Normal View
Normal view splits you screen into three major sections: The outline and slides tabs, the slide pane, and the task pane. The outline and slides tabs are on the left side of your screen. They enable you to shift between two different ways of viewing your slides. The slides tab shows thumbnails of your slides. The outline tab shows the text on your slides. The slide pane is located in the center of your screen. The slide pane shows a large view of the slide on which you are currently working. The task pane is located on the right side of your screen. The tasks pane enables you to select the task you want to perform.
Slide Sorter View
Slide sorter view enables you to view thumbnails of all your slides. In slide sorter view you can easily add, delete, or change the order of your slides. When you are in slide sorter view, a special formatting toolbar appears. It has options that allow you to make changes to your slides.
Slide Show
Use the slide show view when you want to view your slides, as they will look in your final presentation. When in Slide Show view.
|
ESC: Return you to the view you were using previously. |
|
Left-clicking: Moves you to the next slides or animation effects when you reach the last slide you automatically return to your last view. |
|
Right-clicking: opens a pop-up menu can use this menu to navigate the slides add Speaker notes select a pointer and mark your presentation. |
Adding Notes in Power Point
There are two ways to insert notes in Power Point
1. To insert short notes: In the normal view, click on the notes box at the bottom of our screen and type our text.
2. To insert longer notes: Click on the view tab. Under presentation views select the notes page button. Type our notes in the space that appears below our slide.
Inserting Headers & Footers
Headers and/or footers are used on Power point slide to include important information about the slides. This can be information for the presenter or audience, such as the date this presentation was created or delivered, to brand the slides with your company name or simply to automatically place a slide number on each slide. To add a header and footer, click on the insert tab, then on the Header & Footer button. The date and time and slide number buttons will bring up the same dialog box
1. Fixed and Automatic dates: Power Point gives the option to add either a fixed date and time, which will remain the same, or a date and time that automatically update. If we choose to have a date and time that automatically update, the date and time will always match the data and time that we run our slide show.
2. Slide Number: Check this box to show the slide number.
3. Footer: Check the Footer box and add text to have text appear at the bottom of the slide.
4. Apply / Apply to All: To insert our chosen elements into our slide, select apply to have the information appear only on our current slide, or Apply to all to have it appear on every slide. If any of the information is repeated on the title slide, check the "don?t show" on title slide box to avoid repeating the information.
5. Preview: The Preview box shows us where on our slide the information will appear. We cannot change this from within this screen, but once w insert the information we can click and drag the box anywhere in our slide, just like any other text box.
6. Notes and Handouts: Under this tab, we can choose our header and footer preferences for hands.
Power Point Shortcut Keys
|
Action |
Power Point shortcut |
|
Bold |
CTRL + B |
|
Close |
CTRL + W |
|
Close |
CTRL + F4 |
|
Find |
CTRL + F |
|
Italics |
CTRL + I |
|
Menu Bar |
F10 |
|
New Slide |
CTRL + N |
|
Next Window |
CTRL + F6 |
|
Open |
CTRL + O |
|
Paste |
CTRL + V |
|
|
CTRL + P |
|
Repeat find |
SHIFT - F4 |
|
Repeat/Redo |
CTRL + Y |
|
Replace |
CTRL + R |
|
Save |
CTRL + S |
|
Slide Show: begin |
F5 |
|
Slide Show: black screen show /hide |
B |
|
Slide Show: End |
Esc |
|
Slide Show: Erase annotations |
E |
|
Slide Show: Go to next hidden slide |
H |
|
Slide Show: Hide pointer and button always |
Ctrl - L |
|
Slide Show: Hide pointer and button temporarily |
Ctrl-H |
|
Slide Show: Mouse pointer to arrow |
CTRL+A |
|
Slide Show: Mouse pointer to pan |
CTRL+P |
|
Slide Show: Next slide |
N |
|
Slide Show: Previous slide |
P |
|
Slide Show: Set new timing while rehearsing |
T |
|
Slide Show: Set new timing stop / restart Automatically |
CTRL + H |
|
Slide show: Use mouse-click to advance (rehearsing) |
M |
|
Slide Show: Use original timings |
O |
|
Slide Show: White screen show /hide |
W |
|
Spelling and Grammar check |
F7 |
|
Switch to the next presentation window |
CTRL- F6 |
|
Switch to the next to a dialog box |
CTRL + TAB / CTRL - Page Down |
|
Switch to the previous presentation window |
CTRL ? Shift ? F6 |
|
Switch to the preview tab in a dialog box |
CTRL-SHIFT-TAB/CTRL-page down |
|
Turn character formatting on or of |
NUM/ |
|
Underline |
CTRL - U |
|
Undo |
CTRL - Z |
Microsoft Access: Microsoft Access is a relational DBMS (Database Management System). It handles data management tasks. Microsoft Access allows users to manipulate large amounts of information and retrieve any part of the information. It is a structured database containing data tables that are arranged in a uniform structure of records and fields. A spreadsheet is a table used by small organizations that operates with a limited amount of data but for big organizations a Database Management System is preferred because it needs storing huge amount of data and retrieves it much faster.
In database management system the content and the location of the data is defined by Meta data.
Terms related to Microsoft Access
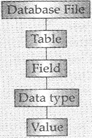
Database File: A database file is a collection of related information that is organized so that it can easily be accessed, managed and updated. We organize files by storing them in folders. The process of arranging data in logical sequence is called sorting. It is an integrated collection of logically-related records that provide data for one or more multiple uses. We can also perform operations on the data that is in a database. For example, retrieve data and modify data. Periodically reviewing and altering the records in a file to ensure that the information they contain is accurate and up-to-date. We can use a database as a computerized record-keeping system that maintains information and that makes the information available when we want the information. For example addresses of employees in an organization or maintain details of students etc.
File updating: In computing, reviewing and altering the records in a file to ensure that the information they contain is accurate and up-to-date. Three basic processes are involved: adding new records, deleting existing records, and amending existing records. The updating of a file is a continuous process because records can be accessed individually and changed at any time. This type of updating is typical of large interactive database systems, such as airline ticket-booking systems. Each time a ticket is booked, files are immediately updated so that double booking is impossible.
In large commercial applications, however, millions of customer records may be kept in a large sequentially ordered file, called the master file. Each time the records in the master file are to be updated such as, when quarterly bills are being drawn up, a transaction file must be prepared. This will m contain all the additions, deletions, and amendments required to update the master file. The transaction file is sorted into the same order as the master file, and then the computer reads both files and produces a new updated master file, which will be stored until the next file updating take place.
Database engine: A database engine is a part of a DBMS. It provides a hard disk.
Data dictionary: the data dictionary contains data about data or list of data files. It means that it contains the actual database descriptions used by the DBMS, no original data. In most DBMS, the data dictionary is active and integrated. It means that the DBMS checks the data dictionary every time the database is accessed.
Directory: It is a hierarchical structure used to organize folders and files. It has information about files. It is a virtual container in which groups of computer files and other folders can be kept and organized. The topmost or main directory in any file is called the root directory. A directory that is below another directory is called a sub directory A directory above a subdirectory is called the parent directory.
Table: A table is a collection of data about a specific topic that is stored in rows and columns or in relational database a table is a data structure tha is organized using a structure of columns and rows. A table has a specified number of columns, but can have any number of rows. When we create a new table. Access asks to define fields, giving each a unique name1 and data type. In one database there can be multiple tables.
Field: A space allocated for a particular item of information is field. A field is a column in a table. SQL Server supports more fields, but only 25 fields are visible in Access. The definition of a field includes the name of the field, the type of data that is stored in the field, and any validation rules that you must have to validate the stored data. For example a tax form, contains a number of fields such as name, address, income and so on. In database systems, fields are the smallest units of information. In spreadsheets, field are called cells.
Record: In database management systems, a record is a row in a table. We may store any number of records in a table. Records are composed of fields, each of which contains one item of information. A set of records makes a file. For example, a personnel file contains records that have fields such as name, address and a phone number etc. A data type determines the type of data that the field can store. After naming a field, we must decide what type of data the field will hold. Before you begin entering data, you should decide the data types that our system would use such as in any database numeric field can store numbers used to perform calculations. Data type can be Text, Memo, Numeric, Date / Time, Currency, Auto-Number etc.
Forms: Forms are screens for displaying data from and inputting data into tables. In Access, we can use a form as the graphical user interface to data. Forms do not store any data but they fetch data from tables or from queries and then present this data for us. We can use a form to insert data in a table, to modify the existing data in a table, or to delete data from a table.
Reports: Report are output. Anything we decide to print deserves a report, whether it is a list of names and addresses, a financial a period, or a set of mailing labels. Access Wizards allow us go through the process of defining reports. A report presents the data from a table or from a query in a pre-formatted and useful manner. You can control the appearance of a report. Reports can use controls to improve the graphical representation of data and to make the reports more useful.
Page: We use pages to enter or display data via Internet. Pages are stored as HTML files, with data read from and written to the database.
Macros: an Access Macro is a script for doing some job. For example, to create a button which opens a report, you could use a macro which fires off the "Open Report" action. Macros can also be used to set one field based on the value of another. Each line of a macro performs some action, and the bottom half of the macro screen provides the details of how the action is to apply
Primary Key: Primary key is a field or group of fields that uniquely identify records in a table. Every table can have only one primary key. Primary key cannot be null value, it always has unique value. Primary key is used to relate one table to another as a foreign key.
Foreign key: Foreign key is a key in a table that refers to primary key field in another table.
Relationship: A relationship is a link that is created between two tables and enables us to accessed data from both tables simultaneously. A relationship is an association between access tables or queries that use related fields. It can be one-to-one, one-to-many, many-to-one, or many-to-many.


You need to login to perform this action.
You will be redirected in
3 sec

