Current Affairs 9th Class

* Running a Slide Show   When you create 4 to 5 slides, you can run this presentation as a slide show. Slideshow means viewing the slides of presentation in succession.     * To run a slide show we need to follow the following steps: 
  • Select Slide Show -> View Show. The first slide of the presentation will be displayed and thus it covers the full screen.
  • Click the screen to view the next slide. Alternatively, a menu is displayed when you click the rectangular shaped icon at the bottom left hand corner of the screen.
  • Then click Next to display the next slide.  
  *  PowerPoint views Microsoft PowerPoint introduces with different views to help while creating a presentation. Slide sorter view and normal view are the two main views used in PowerPoint. You can click the buttons at the lower left of the PowerPoint window to easily switch between views.         * Slide Sorter View You can see all the slides in the presentation on screen at the same time in the slide sorter view, displayed in miniature. It makes easy to move, add and delete slides. You may also preview animations on multiple slides by selecting the slides you want to preview and then clicking Animation Preview on the Slide Show menu. You can also add special effects, such as animation and sound on title text, bulleted text, sub title text and picture. For example: text moving from left to right and top to bottom with background sound is called animated slide. You can also add some special effect in your slide.     * To apply animation in slide: 
  • Select the slide and slide show -> Custom Animation
  • Select the Object(s) from Check to Animate slide object box
  • Select effects from Entry Animation and Sound list box and click OK.  
  *  Apply Transition The process in which the incoming slide moves on the screen and the outgoing slide moves off the screen during a slide show thus these special effects applied to crossover between slides are known as transitions.     * To apply transition performs the following steps: 
  • Select Slide Show -> Slide Transition to open the Slide Transition pane, as shown in the following figure: (See Figure. 9.6.4)
  • From the Apply to selected slides list select the type of transition.
  • Select the speed from Speed list box and select sound from Sound list box, in Modify transition section. Select whether you want transition of slide automatic or on mouse click, in Advance slide section.  

*   Introducing PowerPoint   Microsoft PowerPoint is basically a presentation of graphics package, which helps in the formulation of presentations requiring slides. With the help of PowerPoint slides can be prepared quickly and having a consistent look to the presentation. The use of slides enhances the effectiveness of communication and clarity of subject material to the audience as well as its retention by them.     * To start PowerPoint: 
  • Double click PowerPoint 2003 icon on the desktop.
              Or
  • Click Start and Select Programs -> Microsoft Office -> Microsoft Office PowerPoint 2003, to open the Microsoft PowerPoint window.  
  * To open a blank presentation: 
  • Click create a new Presentation link on the Getting Started pane. A new window opens.
  • Click Blank presentation link on the New Presentation pane, when a new presentation opens, the Slide Layout pane on the right side of the window appears.
  • Select me layout which you want to select by double-clicking on any one of them.  
  *  The Basic Elements of Slides: 
  • Outline Pane: Allows you to organize and develop the content of the presentation. You can type all the text of the presentation and paragraphs and slides, rearrange bullet points.
  • Slide Pane: Enables you to view the text look on each side you can add movies, graphics and sounds, add animations to individual slides and create hyperlinks.
  • Notes Pane: Allows you to add information or speaker notes that you want to share with the audience, to add graphics in notes; you need to add the notes in note page view.  
  * Inserting a New Slide Changing the Layout of a Slide
  • To insert a new slide in the presentation:
  • Select Insert -> New Slide, as shown in the following figure:  
  * To change the layout: 
  • Select the slide in which the layout needs to be changed.
  • Select the appropriate slide-layout from the Slide Layout pane.  
  * Adding Text in the Layout You need to click "Click to add title area" of the slide layout and thus type the title of the presentation. In the same way, click "Click to add subtitle" area of the slide layout and then type the subtitle of the presentation.     *  Inserting WordArt WordArt is an auto shape toolbar that allows creating a variety of three-dimensional word shapes to add to their slides. You can change the text, determine text wrapping points and even modify the orientation of the text.     * To insert the word art: 
  • Select the area of the slide where you want to place the word art.
  • Click the Insert WordArt button to open the WordArt gallery, as shown in the following figure: (See Figure. more...

*    Creating Tables   Some time you need to represent information in tabular forms. Word 2003 enables the facility to insert a table in word document easily. You can apply various functions. such as insert and delete data. You can also increase or decrease number of columns and rows according to your requirements.     * To insert a table in word document: 
  • Place the cursor where you want to place the table.
  • Select Table -> Insert -> Table to display the Insert Table dialog box, as shown in the following figure:
  • Set the number of columns in the Number of columns text box.
  • Set the number of rows in the Number of rows text box.
  • To close the Insert Table dialog box Click OK.
  • A table with the defined number of rows and columns will get inserted in the document.  
You can move the cursor in table by tab key or arrow key or click in the appropriate cell. After inserting table in a document, it can be modified as it required. The columns and rows can be added to the table or deleted from the table.     * To add a row: 
  • Where the row is to be added above or below in the cell place the insertion point there itself.
  • Select Table -> Insert -> Rows Below or Rows Above.    
  * To add column: 
  • Where a new column is to be added place the insertion point in the column beside that place.
  • Select Table -> Insert -> Columns to the Right or Columns to the Left.  
  *  To delete rows: 
  • The row to be deleted place the insertion point there.
  • Select Table -> Delete -> Rows.  
  * To delete columns: 
  • The column to be deleted place the insertion point there.
  • Select Table -> Delete ->1 Columns.  
  * Thesaurus Thesaurus allows looking word in another language. If your document is written in French and you want to see the synonyms in other language of that word use thesaurus.     * To use thesaurus: 
  • Click Research on the Tools menu to open the research dialog box.
  • In the Search for list, select Thesaurus.
  • Press ALT and click the word you want to look up.
  • Results will appear in the Research task pane.  
    You Know.jpg 
  • You can save your word document in XML format.  
    Important.jpg 
  • WordArt: Is an auto shape toolbar in Microsoft Word 2003 that allows creating variety of three-dimensional word shapes to add to the document
  • Thesaurus: Allows looking word in another language.  
    Summary.jpg 

*     Kerning   Word 2003 enables to adjust Kerning in your document. Basically it is a process of moving letters closer together, in an effort to overcome the illusion of too much space between letters. It makes the text both more appealing and readable. In Word, kerning can be adjusted either automatically or manually.     * To change kerning automatically: 
  • Select the text and right click to open the popup menu.
  • Click Font to open the Font dialog box, as shown in the following figure: (See Figure. 9.5.10)
  • Click Character Spacing tab and adjust the character spacing and positions.
  • Select the Kerning for fonts check box, as shown in the following figure:
  • Click OK.  
  * Working with WordArt Word Art is an excellent feature of Word 2003. Basically it is an auto shape toolbar in Microsoft Word 2003 that allows creating a variety of three-dimensional word shapes. You can change the text, determine text wrapping points and even modify the orientation of the text.       * To insert the word art: 
  • Select the area of the document where you want to place the word art.
  • Click anywhere inside of the document to select a location for the placement of the word art.
  • Click Insert WordArt to open the WordArt gallery, as shown in the following figure:
  • Select the desired word art design.
  • Click Ok to open the Edit WordArt Text dialog box, as shown in the following figure;
  • Type the text and set the font and size.
  • Click OK to apply all effects.  
   

*  Search and Replace Text   MS Word provides the facility to search or match specific text in the document. You can also replace the searched text with other text. This facility is very useful because it minimizes the time and effort required for searching the text in the document.     * To open the Find & Replace dialog box: 
  • Select Edit -> Find or Replace menu option or press Ctrl + F short cut key, as shown in the following figure: (See Figure. 9.5.8)
  • Enter the word or text, which you want to search for in the Find what list box and click Replace tab.
  • Enter the word that you want to replace in Replace with list box.
  • Click Find Next for finding specified word. This will highlight the word in the whole document.
  • Click Replace All for replacement of word in the whole document or click replace to replace the current highlighted word.  
    * Inserting an Image using Clipart MS Word enables you to insert image or shape in a document. Clipart is a library that provides number of picture. You can directly insert those images in your document. To insert an image: (See Figure. 9.5.9)      
  • Locate the cursor where you want to insert an image.
  • Go to the menu bar and select Insert -> Picture -> Clipart, as shown in the following figure:
  • Select the appropriate picture and right-click to open pop menu.
  • Click Insert.  

*     Printing Document   To print the document you need to perform the following steps:
  • Click File menu and select print option to open print dialog box, as shown in the following  figure: (See Figure. 9.5.6) OR
  • Click Printer icon on the Standard toolbar. v  In the Copies option, type the number of copies that is to be printed.
  • Click OK.  
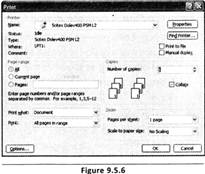
    Note: Ctrl + P can be used to print the entire file.       * Words Counting MS Word allows you to count number of pages, words, character (no space), character (space), paragraph, and lines in a document. To apply word count: (See Figure. 9.5.7) Select Tools ->  Word Count to display the Word Count Dialog box. The Word Count Dialog box display all information including number of page, words, character (no space), character (space), paragraph and lines in a document.           

*    Paragraph Level Formatting     MS Word enables paragraph formatting that includes text alignment, setting margins and line spacing. While applying formatting it affects the entire paragraph even if a single word is selected or the insertion point is placed in the paragraph. To format a paragraph:
  • Select the paragraph/paragraphs to which the formatting has to be applied.
  • Select Format -> Paragraph to display the Paragraph dialog box.
  • In the General section, set the alignment of the paragraph from the Alignment drop-down list.
  • In the Indentation section, set the left, right and special indents from Left, Right and Special drop-down list.  
  * MS Word also enables the following alternative methods to align the paragraph: 
  • Click Align Left in the formatting toolbar for left aligning the text.
  • Click Center in the formatting toolbar for center aligning the text.
  • Click Align Right in the formatting toolbar for right aligning the text.
  • Click Justify in the formatting toolbar for justifying alignment of the text.
Set the spacing before and after the paragraph from the before and after drop-down list. The spacing between each line can be set by selecting a value from the Line spacing drop - down list. Click OK to apply the formatting. (See Figure. 9.5.5)         Question.jpg         Word 2003 allows setting page setup according to your need. To change the page setup you need to open the Page setup dialog box. Which one of the following is the correct step to open page Setup dialog box? (A) Select File -> Page Setup (B) Select Format -> Page Setup (C) Select Insert -> Page Setup (D) Select File Print -> Page Setup (E) None of these     Answer: (A) Explanation Correct Option: (A) Select File  Page Setup to open page setup dialog box. Incorrect Options: Rest of the options is incorrect.          Which one of the following short cut keys allows opening of Help? (A) F1                                                                    (B) F2 (C) Ctrl + S                                                           (D) F3 (E) None of these     Answer: (A) Explanation Correct Option: (A) While pressing F1 key it opens word help. Incorrect Options: Rest of the options is incorrect.

*     Changing Appearance of Text     Lina's class teacher gives an assignment to develop a greeting card using various font and size. She also wants to convert some text in italic. How will she do it? Actually Word has the features to change the document text according to the requirements. Lina can set appearance of her document text by applying font, font size, bold and underline.     * To apply font and font size, she will perform the following steps: 
  • Select the text in the document and click Format -> Font to open the Font dialog box.
  • To set the font, select the required font from the Font list.
  • To set the font style, select the required font style from the Font style list.
  • To set the font size, select the required font size from the Size list.
  • To set the font colour, select the required font colour from the Font colour drop-down list.
  • The preview of the text can be seen in the Preview section.
  • Click OK to close the Font dialog box and apply the selected formatting to the selected text. (See Figure. 9.5.4)    
    * MS Word also enables the following alternative methods that she can used to apply font and font size: 
  • Click Font list on the formatting toolbar to select the font, such as Times New Roman.
  • Click Font Size list on the formatting toolbar to select the size of the font, such as 11.
  • Click Font Colour list to define the colour of the selected text.  
    * To make a particular text bold: 
  • Select text in the document
  • Click Bold or press Ctrl + B key  
  *  To underline a particular text: 
  • Select text in the document
  • Click Underline or press Ctrl + u key  
  *  To apply the Italic on a particular text:
  • Select text in the document
  • Click Italic or press Ctrl + I key  
  *  To apply a particular effect on the text:  Select the check box for the particular effect such as shadow from the Effects section.

*    Using Word Help     Sometime while working on Word you face problem to perform particular steps. Does not worry, Word enables Microsoft Office Word Help that gives the answer of your queries. You can takes advantage of help when you feel difficult to do any steps Using Help user you can use all the basic and advance features of Word 2003 in your document.       * To open Word Help: Select Help -> Microsoft Office Word Help to open the Word Help dialog box, as shown in the following figure: (See Figure. 9.5.2)   Or   Press F1 key. Type the search item in Search for text box and click arrow. Help displays all related information on your screen.           * Making Document Error Free Using spelling and grammar checker you can make your document grammatically correct. The spelling and grammar checker can be executed to check the spellings and grammar in the whole document. By default, Word checks spelling and grammar as the text is being typed in the document. Wavy red underlines indicate possible spelling errors. Wavy green underlines indicate every possible grammatical issue.     * To start the spelling and grammar checker: 
  • Select Tools -> Spelling and Grammar to display the Spelling and Grammar dialog box, as shown in the following figure: (See Figure. 9.5.3)
  • Click Ignore Once to ignore the spelling mistake or Change button to change the word with the suggested spelling.
  • After completing the spelling and grammar checking in the whole document, a message box appears "spelling and grammar check is complete".
  • Click OK.

*    Changing Page Setup     Word 2003 enables Page Setup dialog box that allows setting document according to user requirement. Page Setup dialog box includes page margins and page setting. The blank spaces around the edges of the page are called page margins. A user can set your page margins according to insert text and graphics. You can also set some items in the margins, such as page number, header and footer.       * To set the page margins:
  • Select File -> Page Setup to open Page Setup dialog box, as shown in the following figure: (See Figure. 9.5.1)
  • Click Margins tab.
  • Set the margins and orientation, such as landscape.
  • Click OK.  
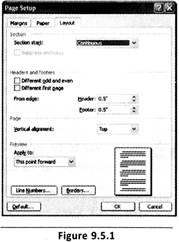
      Word 2003 automatically inserts section breaks (section break: A mark you insert to show the end of a section. A section break stores the section formatting elements, such as the margins, page orientation, headers and footers, and sequence of page numbers, before and after the pages with the new paper size. You can also set paper size according to your requirements.       * To change the paper size: 
  • Select File -> Page Setup to open Page Setup dialog box.
  • Click Paper tab and select a paper size, as shown in the following figure;


You need to login to perform this action.
You will be redirected in 3 sec spinner