
 Multimedia and Games
Today, multimedia games are big business. The concept of gaming is an essential part of entertainment in our everyday lives. Gaming allows humans to interact with a machine to simulate a real world situation. The joystick is a device which is mainly used to play games on the computer. These days, children resort to game consoles such as play stations and Xboxes rather than physical games with active interaction with other kids.(See Figure 5.5.2)
Multimedia and Games
Today, multimedia games are big business. The concept of gaming is an essential part of entertainment in our everyday lives. Gaming allows humans to interact with a machine to simulate a real world situation. The joystick is a device which is mainly used to play games on the computer. These days, children resort to game consoles such as play stations and Xboxes rather than physical games with active interaction with other kids.(See Figure 5.5.2)

 ___________is usually used to play games on the computer.
(A) Scanner
(B) Printer
(C) Joystick
(D) Microphone
(E) None of these
Answer: (c)
Explanation
Correct Option:
(C) Joystick: Joystick is the device mainly used to play games on the computer.
Incorrect Options:
(A) Scanner: This option is incorrect
(B) Printer: This option is incorrect
(D) Microphone: This option is incorrect
(E) None of these: This option is invalid
In today's Multimedia age, there is a lack of _______ games.
(A) Mind
(B) Interactive
(C) Computer
(D) Physical
(E) None of these
Answer: (D)
Correct Option:
(D) Physical: In today's Multimedia age, there is a lack of physical games.
Incorrect Options:
(A) Mind: This option is incorrect
(B) Interactive: This option is incorrect
(C) Computer: This option is incorrect
(E) None of these: This option is invalid
___________is usually used to play games on the computer.
(A) Scanner
(B) Printer
(C) Joystick
(D) Microphone
(E) None of these
Answer: (c)
Explanation
Correct Option:
(C) Joystick: Joystick is the device mainly used to play games on the computer.
Incorrect Options:
(A) Scanner: This option is incorrect
(B) Printer: This option is incorrect
(D) Microphone: This option is incorrect
(E) None of these: This option is invalid
In today's Multimedia age, there is a lack of _______ games.
(A) Mind
(B) Interactive
(C) Computer
(D) Physical
(E) None of these
Answer: (D)
Correct Option:
(D) Physical: In today's Multimedia age, there is a lack of physical games.
Incorrect Options:
(A) Mind: This option is incorrect
(B) Interactive: This option is incorrect
(C) Computer: This option is incorrect
(E) None of these: This option is invalid  Multimedia in Entertainment
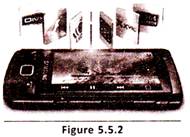
Multimedia is heavily used in the entertainment industry, especially to develop special effects in movies and animations. Some examples are Avtar Jurassic Park and Lion King. Multimedia games are a popular pastime and the same goes for software programs available either as CD-ROMs or online. Some video games also use multimedia features. Multimedia applications that allow users to actively participate instead of just sitting by as passive recipients of information are called Interactive Multimedia. (See Figure 5.5.2)
Multimedia in Entertainment
Multimedia is heavily used in the entertainment industry, especially to develop special effects in movies and animations. Some examples are Avtar Jurassic Park and Lion King. Multimedia games are a popular pastime and the same goes for software programs available either as CD-ROMs or online. Some video games also use multimedia features. Multimedia applications that allow users to actively participate instead of just sitting by as passive recipients of information are called Interactive Multimedia. (See Figure 5.5.2)

 Interactive Multimedia allows the users to ______ in the application.
(A) Passively participate
(B) Process input and output
(C) Send email
(D) Actively participate
(E) None of these
Answer: (d)
Explanation
Correct Option:
(D) Actively participate: Interactive Multimedia allows the users to actively participate in the application.
Incorrect Options:
(A) Passively participate: This option is incorrect
(B) Process input and output: This option is incorrect
(C) Send email: This option is incorrect
(E) None of these: This option is invalid
Multimedia can be used to develop _______ in movies.
(A) Audio
(B) Video
(C) Graphics
(D) Special effects
(E) All of these
Answer: (e)
Explanation
Correct Option:
(E) All of these: Multimedia is very versatile and can be used to develop audio, video, graphics and special effects in movies.
Incorrect Options:
(A) Audio: This option is only partially correct
(B) Video: This option is only partially correct
(C) Graphics: This option is only partially correct
(D) Special effects: This option is only partially correct
Interactive Multimedia allows the users to ______ in the application.
(A) Passively participate
(B) Process input and output
(C) Send email
(D) Actively participate
(E) None of these
Answer: (d)
Explanation
Correct Option:
(D) Actively participate: Interactive Multimedia allows the users to actively participate in the application.
Incorrect Options:
(A) Passively participate: This option is incorrect
(B) Process input and output: This option is incorrect
(C) Send email: This option is incorrect
(E) None of these: This option is invalid
Multimedia can be used to develop _______ in movies.
(A) Audio
(B) Video
(C) Graphics
(D) Special effects
(E) All of these
Answer: (e)
Explanation
Correct Option:
(E) All of these: Multimedia is very versatile and can be used to develop audio, video, graphics and special effects in movies.
Incorrect Options:
(A) Audio: This option is only partially correct
(B) Video: This option is only partially correct
(C) Graphics: This option is only partially correct
(D) Special effects: This option is only partially correct  Multimedia in Education
In the field of education, teachers incorporate multimedia to replace actual lecture and practical demonstration. Multimedia brings the power of interactivity into learning. In this way, multimedia is different from the television. In education, multimedia is used to produce computer-based training courses (popularly called CBTs) and reference books like encyclopedias and almanacs which are very popular. CBTs make use of text, graphics, sound and animation. More and more educational institutions are turning to interactive learning through multimedia which presents continuous choices to the students. This has helped in international education and training of masses. A DVD or CD-ROM can be shipped for enhanced flexibility.
Multimedia in Education
In the field of education, teachers incorporate multimedia to replace actual lecture and practical demonstration. Multimedia brings the power of interactivity into learning. In this way, multimedia is different from the television. In education, multimedia is used to produce computer-based training courses (popularly called CBTs) and reference books like encyclopedias and almanacs which are very popular. CBTs make use of text, graphics, sound and animation. More and more educational institutions are turning to interactive learning through multimedia which presents continuous choices to the students. This has helped in international education and training of masses. A DVD or CD-ROM can be shipped for enhanced flexibility.

 Multimedia is different from television because of its ______.
(A) Animation
(B) Sound
(C) Graphics
(D) Interactivity
(E) None of these
Answer: (d)
Explanation
Correct Option:
(D) Interactivity: Multimedia is media that uses interactivity which cannot be found in television.
Incorrect Options:
(A) Animation: This option is incorrect
(B) Sound: This option is incorrect
(C) Graphics: This option is incorrect
(E) None of these: This is an invalid option
In the field of education where the student learns by executing special training programs on a computer, CBT refers to ______.
(A) Computer-Based Testing
(B) Computer-Based Training
(C) Compulsory Basic Training
(D) Complete Binary tree
(E) None of these
Answer: (b)
Explanation
Correct Option:
(B) Computer-Based Training; Is a type of education in which the student learns by executing special training programs on a computer
Incorrect Options:
(A) Computer-Based Testing: This option is incorrect
(C) Compulsory Basic Training: This option is incorrect
(D) Complete Binary tree: This option is incorrect
(E) None of these: This is an invalid option
Multimedia is different from television because of its ______.
(A) Animation
(B) Sound
(C) Graphics
(D) Interactivity
(E) None of these
Answer: (d)
Explanation
Correct Option:
(D) Interactivity: Multimedia is media that uses interactivity which cannot be found in television.
Incorrect Options:
(A) Animation: This option is incorrect
(B) Sound: This option is incorrect
(C) Graphics: This option is incorrect
(E) None of these: This is an invalid option
In the field of education where the student learns by executing special training programs on a computer, CBT refers to ______.
(A) Computer-Based Testing
(B) Computer-Based Training
(C) Compulsory Basic Training
(D) Complete Binary tree
(E) None of these
Answer: (b)
Explanation
Correct Option:
(B) Computer-Based Training; Is a type of education in which the student learns by executing special training programs on a computer
Incorrect Options:
(A) Computer-Based Testing: This option is incorrect
(C) Compulsory Basic Training: This option is incorrect
(D) Complete Binary tree: This option is incorrect
(E) None of these: This is an invalid option  Introduction
Multimedia is a powerful tool and has created a trend in how people deal with everyday life. The traditional cassette players have been replaced by MP3 players with music video capabilities. Multimedia is one of the most fascinating and fastest growing areas in the field of information technology. It is a combination of text, pictures, animation, movies and sound. Multimedia finds its application in various areas such as advertisements, art, education, entertainment, engineering, medicine, mathematics, business and scientific research.
Introduction
Multimedia is a powerful tool and has created a trend in how people deal with everyday life. The traditional cassette players have been replaced by MP3 players with music video capabilities. Multimedia is one of the most fascinating and fastest growing areas in the field of information technology. It is a combination of text, pictures, animation, movies and sound. Multimedia finds its application in various areas such as advertisements, art, education, entertainment, engineering, medicine, mathematics, business and scientific research.  Mail Merge
All of you may have seen some form of pre-printed stationary like letterheads, forms, address lists etc. MS Word has advanced features to create office stationary. For example, a document can get printed automatically with the company name, address and logo. This feature in MS Word is called Mail Merge. Mail merge is used for simplifying repetitive documents and tasks. Mail merge can be used for creating a large number of documents that contain identical formatting, layout, text, graphics, etc. and where only certain portions of each document varies. Mail merge is also used for generating mailing labels, envelopes, address lists, personalized training handouts, etc. In addition to hard copy mail shots (circular, leaflet, or other advertising material sent by post), it can also be used to generate multiple emails and electronic faxes. Whenever you need to assemble similar data, mail merge is a good solution. (See Image 5.4.15)
Mail Merge
All of you may have seen some form of pre-printed stationary like letterheads, forms, address lists etc. MS Word has advanced features to create office stationary. For example, a document can get printed automatically with the company name, address and logo. This feature in MS Word is called Mail Merge. Mail merge is used for simplifying repetitive documents and tasks. Mail merge can be used for creating a large number of documents that contain identical formatting, layout, text, graphics, etc. and where only certain portions of each document varies. Mail merge is also used for generating mailing labels, envelopes, address lists, personalized training handouts, etc. In addition to hard copy mail shots (circular, leaflet, or other advertising material sent by post), it can also be used to generate multiple emails and electronic faxes. Whenever you need to assemble similar data, mail merge is a good solution. (See Image 5.4.15)
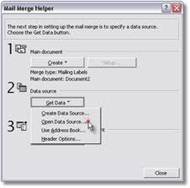 Mail merge primarily consists of two files, the Main Document and the Data Source or Data File. The Main Document contains the information that will remain the same in each record, and the Data Source contains all the variable information, in the form of fields. This is the information that will change in the Main Document when the merge is completed. When the Main Document and Data Source are merged, Microsoft Word replaces each merge field in the Main Document with the data from the respective field contained in the Data Source. The end result is a third document, a combination of the Main Document and Data Source. There is also an option to mail merge directly to the printer, fax or email
 For example:
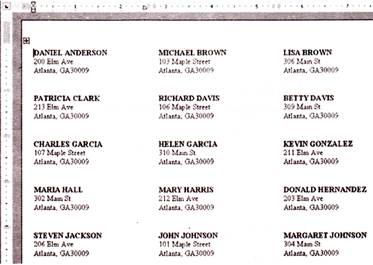
A company can use a mail merge when it wants to create a new product announcement which is being sent to the top 500 customers. In this case, the text of the letter is always the same but the name and address are different for each customer. These customer names and addresses are stored in a data source, which is a data file that contains the unique information that should be included. (See Image 5.4.16) In a data file, information is organized into columns and rows. Each column represents a category, such as first name, last name, company, or street address. Except for the first row, each row represents one complete record or set of data. The first row is called the Header row and contains the column names. To add unique information in a mail merge, you place fields in the main document. The fields correspond to the names of the columns that contain the information that you want to include.
For example:
A company can use a mail merge when it wants to create a new product announcement which is being sent to the top 500 customers. In this case, the text of the letter is always the same but the name and address are different for each customer. These customer names and addresses are stored in a data source, which is a data file that contains the unique information that should be included. (See Image 5.4.16) In a data file, information is organized into columns and rows. Each column represents a category, such as first name, last name, company, or street address. Except for the first row, each row represents one complete record or set of data. The first row is called the Header row and contains the column names. To add unique information in a mail merge, you place fields in the main document. The fields correspond to the names of the columns that contain the information that you want to include.
 For example:
In the product announcement, you can place fields for first name, last name, more...
For example:
In the product announcement, you can place fields for first name, last name, more...  Drawing Tools in MS-WORD
The set of Word drawing tools is extensive, easy to use, and powerful. They enable anyone to create good quality images or designs for a multitude of practical applications. Microsoft Word offers many powerful drawing tools to let you control fill colour, line colour, line style, shadows, 3D effects, grouping, ordering, and more. The easiest way to access these features is through the drawing toolbar. Normally the drawing toolbar is at the bottom of your Word screen.
Drawing Tools in MS-WORD
The set of Word drawing tools is extensive, easy to use, and powerful. They enable anyone to create good quality images or designs for a multitude of practical applications. Microsoft Word offers many powerful drawing tools to let you control fill colour, line colour, line style, shadows, 3D effects, grouping, ordering, and more. The easiest way to access these features is through the drawing toolbar. Normally the drawing toolbar is at the bottom of your Word screen.
 If it is not activated, you can turn it on by doing the following:
The toolbar will look like the image below. We will explore the function of each of the buttons.
If it is not activated, you can turn it on by doing the following:
The toolbar will look like the image below. We will explore the function of each of the buttons.
 Function of commonly used buttons of the Drawing Toolbar
 Displays a pull down menu with several drawing options
 Changes the pointer to a selection arrow
 Rotates the selected object to any degree
 Displays a pull down menu with several libraries of shapes
 Draws a line where you ctick and drag. Hold the Shift key d to make the line straight
 Inserts a line with an arrowhead where you click and drag
 Draws a rectangle where you click and drag. Hold down shift to draw a square
 Draws an oval where you click and drag. Hold down Shift to draw a circle
 Draws a text box where you click and drag
 Create text effects with Word Art
 Adds, modifies, or removes fill colour from a selected object
 Adds, modifies, or removes line colour
 Formats the selected text with the colour you click
 Changes the thickness of lines
 Selects dash style for dashed lines
 Selects arrow style, placement and shape of arrowhead
 Displays a pull down menu which offers shadow choices
 Adds 3-d effects to rectangles or ovals

 The correct sequence for activating the Drawing toolbar in Word is
(A) Format-> Toolbars->Drawing
(B) more...
The correct sequence for activating the Drawing toolbar in Word is
(A) Format-> Toolbars->Drawing
(B) more...  Graphics with MS-WORD
You might have heard the famous saying that a picture is worth 1000 words. Pictures make a document or report attractive and add meaning to it. Along with your text, you may want to add some pictures to your document. For example, if you are creating a project on the Solar System, you may want to include a photograph of the planets. (See Image 5.4.13)
Graphics with MS-WORD
You might have heard the famous saying that a picture is worth 1000 words. Pictures make a document or report attractive and add meaning to it. Along with your text, you may want to add some pictures to your document. For example, if you are creating a project on the Solar System, you may want to include a photograph of the planets. (See Image 5.4.13)
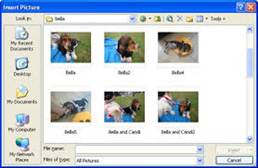
 To insert a picture from a file you have already saved on your computer, perform the following steps:

 The option to add pictures to your document is found in the_________.
(A) Tools menu
(B) View menu
(C) Insert menu
(D) None of these
(E) All of these
Answer : (c)
Explanation
Correct Option:
(C) Insert menu: The option to add pictures to your document is found in the Insert menu.
Incorrect Options:
(A) Tools menu: This option is incorrect
(B) View menu: This option is incorrect
(D) None of these: This option is invalid
Once you have inserted a picture in your document, you cannot resize it. The given statement is________.
(A) True
(B) False
Answer: (b)
Explanation
Correct Option:
(B) False: Once you have inserted a picture in your document, you can resize it by clicking and dragging one of the corner handles.
Incorrect Options:
(A) True: Once you have inserted a picture in your document, you can resize it.
The option to add pictures to your document is found in the_________.
(A) Tools menu
(B) View menu
(C) Insert menu
(D) None of these
(E) All of these
Answer : (c)
Explanation
Correct Option:
(C) Insert menu: The option to add pictures to your document is found in the Insert menu.
Incorrect Options:
(A) Tools menu: This option is incorrect
(B) View menu: This option is incorrect
(D) None of these: This option is invalid
Once you have inserted a picture in your document, you cannot resize it. The given statement is________.
(A) True
(B) False
Answer: (b)
Explanation
Correct Option:
(B) False: Once you have inserted a picture in your document, you can resize it by clicking and dragging one of the corner handles.
Incorrect Options:
(A) True: Once you have inserted a picture in your document, you can resize it.  Setting Tabs
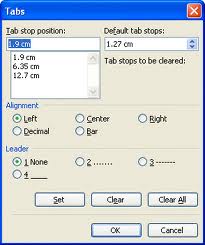
Tabs are a paragraph-formatting feature used to align text in MS Word. When you press the Tab key. Word inserts a tab character and moves the cursor or the insertion point to the tab setting, called the tab stop. You can set custom tabs or use Word's default tab settings. Tabs are set to distribute text evenly between the left and right margins. Word's default tabs are set every half-inch. These tabs are indicated at the bottom of the horizontal ruler by tiny tick marks. If you do not want to use the default tabs that are set at half-inch tabs, you have two choices. You can either change the distance between the default/existing tabs or create custom tabs. Custom tab settings are indicated on the horizontal ruler by tab markers. There are two ways to set tabs - by either using the Tabs Dialog Box or using the ruler. (See Figure 5.4.10)
Setting Tabs
Tabs are a paragraph-formatting feature used to align text in MS Word. When you press the Tab key. Word inserts a tab character and moves the cursor or the insertion point to the tab setting, called the tab stop. You can set custom tabs or use Word's default tab settings. Tabs are set to distribute text evenly between the left and right margins. Word's default tabs are set every half-inch. These tabs are indicated at the bottom of the horizontal ruler by tiny tick marks. If you do not want to use the default tabs that are set at half-inch tabs, you have two choices. You can either change the distance between the default/existing tabs or create custom tabs. Custom tab settings are indicated on the horizontal ruler by tab markers. There are two ways to set tabs - by either using the Tabs Dialog Box or using the ruler. (See Figure 5.4.10)
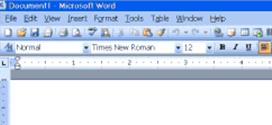
 Setting tabs by using the Ruler is an easy, two-step process.
Click the Tab Alignment button on the left of the ruler to choose the type of alignment.
Click the position on the ruler to set the tab.
Setting tabs by using the Ruler is an easy, two-step process.
Click the Tab Alignment button on the left of the ruler to choose the type of alignment.
Click the position on the ruler to set the tab.
 Steps to set tabs in a document by using the Tabs dialog box:


 Word's default tabs are set at a gap of every ______.
(A) One inch
(B) Half inch
(C) Two inches
(D) none of these
(E) All of these
Answer: (B)
Correct Option:
(B) Hard copy : Word's default tabs are set at a gap of every half-inch.
Incorrect Options:
(A) One inch : This option is incorrect
(C) Two inches: This option is incorrect
(D) None of these: This option is invalid
The option to set Tabs is found in the_________.
(A) Format menu
(B) Insert menu
(C) Tools menu
(D) None of these
(E) All of these
Answer: (a)
Correct Option:
(A) Format menu: The option to set Tabs is found in more...
Word's default tabs are set at a gap of every ______.
(A) One inch
(B) Half inch
(C) Two inches
(D) none of these
(E) All of these
Answer: (B)
Correct Option:
(B) Hard copy : Word's default tabs are set at a gap of every half-inch.
Incorrect Options:
(A) One inch : This option is incorrect
(C) Two inches: This option is incorrect
(D) None of these: This option is invalid
The option to set Tabs is found in the_________.
(A) Format menu
(B) Insert menu
(C) Tools menu
(D) None of these
(E) All of these
Answer: (a)
Correct Option:
(A) Format menu: The option to set Tabs is found in more...  Using Tabs
A Tab with reference to word processing is the jump your cursor makes from one position to another when you press the Tab key on your keyboard.
Using Tabs
A Tab with reference to word processing is the jump your cursor makes from one position to another when you press the Tab key on your keyboard.
 This is How the Tab Key on the Keyboard Looks Like
When you press the Tab key on your keyboard, you will see the cursor jump from left to right in your document. You can control how far the cursor jumps when you press the tab key on the keyboard. You typically set tab stop positions for things like indenting the first line of a paragraph or if you wanted text to start three or four centimeters along the line. (See Figure 5.4.9)
This is How the Tab Key on the Keyboard Looks Like
When you press the Tab key on your keyboard, you will see the cursor jump from left to right in your document. You can control how far the cursor jumps when you press the tab key on the keyboard. You typically set tab stop positions for things like indenting the first line of a paragraph or if you wanted text to start three or four centimeters along the line. (See Figure 5.4.9)
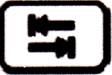

 Identify the Tab key from the following options:


 (E) None of these
Answer: (b)
Explanation
Correct Option:
(B)
(E) None of these
Answer: (b)
Explanation
Correct Option:
(B)  : This is This is the correct picture of the Tab key.
Incorrect Options:
(A)
: This is This is the correct picture of the Tab key.
Incorrect Options:
(A)  : This is the Backspace key
(C)
: This is the Backspace key
(C)  : This is the Shift key
(D)
: This is the Shift key
(D)  : This is the Enter key
When you press the Tab key on your keyboard, you will see the cursor jump from ____ in your document.
(A) Left to right
(B) Right to left
(C) Top to bottom
(D) None of these
(E) All of these
Answer: (a)
Explanation
Correct Option:
(A) Left to right: When you press the tab key on your keyboard, you will see the cursor jump from left to right in your document.
Incorrect Options:
(B) Right to left: This option is incorrect
(C) Top to bottom: This option is incorrect
(D) None of these: This is an invalid option
: This is the Enter key
When you press the Tab key on your keyboard, you will see the cursor jump from ____ in your document.
(A) Left to right
(B) Right to left
(C) Top to bottom
(D) None of these
(E) All of these
Answer: (a)
Explanation
Correct Option:
(A) Left to right: When you press the tab key on your keyboard, you will see the cursor jump from left to right in your document.
Incorrect Options:
(B) Right to left: This option is incorrect
(C) Top to bottom: This option is incorrect
(D) None of these: This is an invalid option  Printing a Document or Text
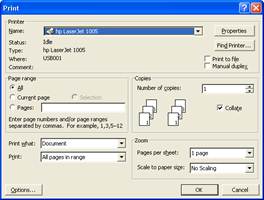
After typing a letter or a report in MS Word, you would like a hard copy (paper output) for future reference.
Printing a Document or Text
After typing a letter or a report in MS Word, you would like a hard copy (paper output) for future reference.
 To print a document, complete the following steps:

 When you take a printout on paper, it is known as________.
(A) Soft copy
(B) Carbon copy
(C) Hard copy
(D) None of these
(E) All of these
Answer: (C)
Explanation
Correct Option:
(C) Hard copy: When you take a printout on paper, it is known as hard copy.
Incorrect Options:
(A) Soft copy: This option is incorrect
(B) Carbon copy: This option is incorrect
(D) None of these: This option is invalid
The option to print is found in the__________.
(A) File menu
(B) Insert menu
(C) Tools menu
(D) none of these
(E) All of these
Answer: (a)
Explanation
Correct Option:
(A) File menu: The option to print is found in the File menu.
Incorrect Options:
(B) Insert menu: This option is incorrect
(C) Tools menu: This option is incorrect
(D) None of these: This is an invalid option
When you take a printout on paper, it is known as________.
(A) Soft copy
(B) Carbon copy
(C) Hard copy
(D) None of these
(E) All of these
Answer: (C)
Explanation
Correct Option:
(C) Hard copy: When you take a printout on paper, it is known as hard copy.
Incorrect Options:
(A) Soft copy: This option is incorrect
(B) Carbon copy: This option is incorrect
(D) None of these: This option is invalid
The option to print is found in the__________.
(A) File menu
(B) Insert menu
(C) Tools menu
(D) none of these
(E) All of these
Answer: (a)
Explanation
Correct Option:
(A) File menu: The option to print is found in the File menu.
Incorrect Options:
(B) Insert menu: This option is incorrect
(C) Tools menu: This option is incorrect
(D) None of these: This is an invalid option 
You need to login to perform this action.
You will be redirected in
3 sec